Mostly about food, this blog is just a place for me to throw things that are of interest to me. I appreciate you taking the time to stop by an look around. This represents just some of the stops on the various pathways that this amateur home cook finds himself.

You may find that these foods tend toward protein and away from carbohydrates - this is due to diabetic issues, so I try to only sparingly use carbs, and good ones at that. Of course, sometimes I forget....

Feel free to drop me a line with any suggestions or just to let me know what you think. Thanks!

If you c


Search This Blog

A Little Navigation...

Yá át ééh!

I want to thank you for the time that you spend here, and hope that you can find useful things here.

Hagoonee'


Saturday, August 6, 2011

The Three Sisters

Naa'ołi, Naadáá' dóó Naayízí

Succotash is probably *the* original American food. Corn, beans and squash have been and remain the principal foods of many Native American tribes. They are called the sisters because they are often used in companion planting, helping each other to thrive. The corn grows tall strong stalks, but has relatively shallow roots. The beans can use the corn for climbing support, and their roots fix nitrogen in the soil for the corn to use. And finally, the squash provides good ground cover, it's large leaves shading the corn's roots and retaining moisture.

Try this as a vegetable dish whose roots go back a long time. The idea is to make it quick and not to overcook the vegetables.

Ingredients
1 unpeeled zucchini/summer squash, medium dice
2 fresh ears (stripped) or 10 oz frozen corn
1 cup cooked beans (Anasazi, Tepary or any variety of heirloom beans), liquid reserved
2 Tablespoons diced red pepper for color
1/8 teaspoon ground sage
fresh ground black pepper to taste
salt to taste


MethodHeat a large, nonstick skillet (or cast iron) over medium high heat.
If using fresh corn, strip the kernels off of the corn cobs - be prepared to chase a few.


Lightly spray the hot pan with an aerosol oil, like Pam. Toss the stripped (or frozen) in the heated pan, stirring constantly so as not to burn them.


Once you smell the roasted corn and see the kernels starting to brown a bit, add in the drained beans and stir to mix well and heat up. Here is an example of dried heirloom beans.


Once the beans are warmed, add in the diced squash, peppers and the sage. Add in enough of the reserved been cooking liquid to adjust the consistency, then taste and season to as desired with salt and pepper. Stir until all is hot and serve immediately. You still want the squash to be a bit firm, not soggy.


Optional: Add some mutton and make it a stew!

Chimney Grill - fast, good, cheap and easy

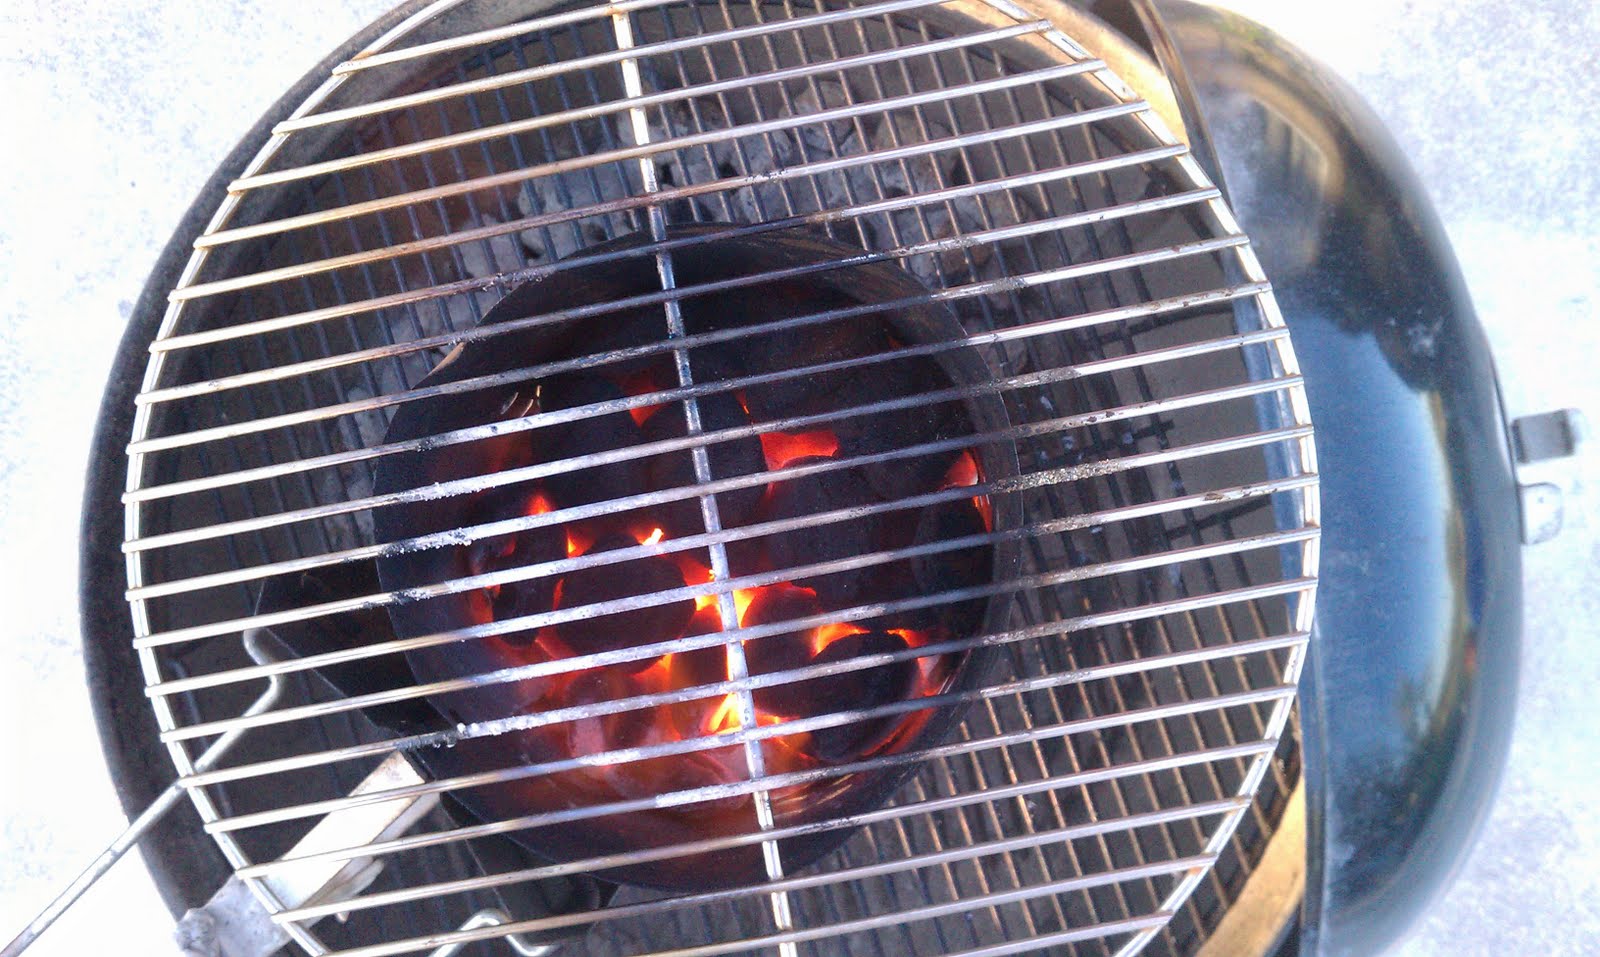
I had two small 2" thick bison filets to grill for tonight's dinner, and it is such a waste to fire up a big old Weber kettle for these two small, quick cooking beauties. A good steak ought to be cooked fast over a hot fire, leaving a nice firm crust (a la Ruth's Chris) and still a nice juicy interior. Can you accomplish this in a fast, easy and inexpensive way? Absolutely! Make sure your meat is at room temperature before putting it on this grill.

Like many people who use and appreciate the subtle excellence of charcoal grilling over propane, I use a chimney for starting my coals instead of *ugh* lighter fluid. They work very well, very quickly, and don't leave any funky tastes behind like petroleum. The best way that I have found to start the chimney is to take 3 paper towels, fold them into the size of one, and drizzle some cooking oil in the center.

Stuff this lightly into the bottom of the chimney, and add the desired amount of charcoal in the top, depending on how much you will need. Once you light the paper, the oil will keep it burning much longer than say, the frequently-used newspaper. The paper towels will also completely disappear, unlike newspaper which leaves a big nasty bunch of ashes behind.

Follow the above instructions for starting the chimney, but you only need to add 15 - 20 briquettes. Told you this would be fast and cheap! Light the paper towels, set the chimney on your regular grill, and let it be for a few minutes until your coals turn gray.

CAUTION:
Do not under any circumstances use this technique and set the chimney on any type of concrete or cinder block (CMU) Concentrated heat like this produces can superheat the moisture in the concrete, and cause it to fracture violently or explode.

The way the chimney works, it draws air up through the bottom and the hot air from the coals shoots out the top. This burns much faster and hotter than in an open grill, and we can take advantage of this.

When this happens, set a small grate on top of your chimney - this will be your new rocket grill. You won't believe how well and quickly this works.

On go the fillets. You will see and smell the goodness almost immediately. Monitor the cooking constantly, this isn't something you can walk away from. Turn after 2-3 minutes. Repeat until both sides are done. Personally, I use a Thermapen from Thermoworks to make sure my internal temps are right - about 125°-130°. You may actually have to move them on and off the fire so as to not overcook the outside while finishing the inside - it's that hot.

Once you pull them off, cover the steaks lightly with foil and let rest for 5 minutes to let the juices redistribute. If you cut it open now, all the nice juice would run out, and leave the meat more dry. If you wait, you get this:

The best part is that what's left f the coals will soon die out, and you have a much easier cleaning up job than if you fired up the whole grill.

Tuesday, August 2, 2011

Enrollado de Pollo Picoso

"Zesty Rolled Chicken"


I just couldn't face making another fattie right now - time for something different. Well, this turned out to be very tasty, and thought it takes a few steps, it's worth making! This is a two-day recipe, as it requires some freezer time.

Ingredients
2 lg chicken breasts
2 oz Mexican chorizo, cooked
4 slices bacon, cooked and crumbled
1/2 cup cilantro leaves
4 oz pepper jack cheese, cut in slices
1 12oz package of bacon slices, straight and even

Served with peppers and onions.
Served with Cilantro-Lime cream sauce.


Day One
First, we need top pound out the chicken - everything else comes after that. Trim all visible fat and other material from the breasts. It can be very easy to get carried away and tear the breasts as you pound them if you aren't careful, so take your time. If you aren't up on this, here's how I do it.

First tip - place the breast between two pieces of plastic wrap with a little water sprinkled on it. This will encourage the breast to spread rather than tear. Start from the middle as you are pounding, working your way out toward the edges. You can use a special meat hammer, but some folks even have been known to use a small cast iron pan or even a can of food! Whatever works for you is what works. If the breast tears a little, in this recipe it's not as critical as it could be in other ones.

Once the breasts are pounded out to about 1/2" thick, lay out a fresh piece of plastic wrap with the long direction running front to back. Place the breasts in the center of the plastic, overlapping the thinnest portions.


For this iteration, I decided to keep the filling simple. I used crumbled bacon, cooked Mexican chorizo, pepper jack cheese and of course, cilantro.


Next, layer the slices from end to end across the chicken plateau. On top of that, place a mix of the bacon and chorizo, followed by sprinkling the cilantro. Liberally grind pepper over the chicken, there's plenty of salt in the bacon and chorizo.


At this point, I'd slide it into the freezer for 30-45 minutes to firm up the chicken - it'll be easier to roll. Just don't freeze it too solid! Once out of the freezer, use the plastic wrap to pull the chicken into a tight roll. Should fillings try to escape out the ends, tuck them back in.


Once it's rolled up tight, twist the ends up tight to firm the shape and back in the freezer. You can try and do the next step now, but without practice, it will be a study in frustration. It's a lot easier if you put the tightened roll in the freezer it goes until solid, probably overnight.


Day Two
Time for the finishing touch. Get the package of bacon out of the fridge, and now jump to the section on making the Bacon Weave. I'll wait for you right here.

So, now you're back and your bacon weave is perfect, right? Don't worry if it's not, it takes practice and you always get to eat the mistakes. If you need to, this is a perfect place in the recipe to freeze this if you so desire. Sometimes it's easier to make more than one, and thaw them out when the mood strikes you. Let's just make sure that the whole roll is defrosted before we approach the grill.

Crank up the fire in the grill using an approved method (a chimney, no fluids!) and when the coals are gray, build a two level fire.


Set up your fire all on one side of the grill under the grate, with no coals under the other side. This will give you the option of a hot fire on one side and a medium fire as you move away, allowing you to control your cooking times and temperature.


Once you get the fire established, on goes your Enrollado de Pollo. Now, you can't just walk away, this will require some babysitting. Sear the roll for 3 minutes on each of the four sides while cooking over the hot coals, replacing the cover after each quarter-turn. Once the bacon is crisped, repeat the quarter turns, but for four minutes per side and off to the side of the fire, again withthe cover down between each turn.

As the filling is already cooked, basically all you are doing is cooking bacon and half an inch of chicken, so it won't take long. When you're done, it should look something like this. I hope that I wouldn't need to remind you, but for my lawyer's sake - remember to remove all the toothpicks you used on the bacon before serving!


I served this dish with grilled onions and red, yellow and green bell peppers. As a dressing, I used a simple Cilantro-Lime cream sauce to complement the bacon/chorizo spiciness. Here's a closeup of the finished slices - they were extra juicy!


OCD Bacon Weave

On occasion, you have to step a little outside the box. If you have been through the other posts on this site, you will have seen some interesting creations, like the fattie and FrankenSwine. Well, unlike them, my newest recipe isn't pork, but like the fattie, it needed that something extra. So, it's time to apply a bacon weave to my latest grilled wonder.

You can find many different ways to make these, and frankly, this is one of the more complicated, but the results look much better. The bacon shrinks a bit as it cooks and makes a nice tight coating. Instead of just making a weave out of bacon and wrapping the food, I actually weave it around the food. Yeah, there's probably a little OCD in the process...

First I measure the roll. In this case, it was about 7" long and 8" in circumference.


I take a long sheet of parchment (or wax paper), and put two parallel creases in it lengthwise that are 7" apart.


Next, I start laying out the bacon slices with about an inch hanging over each crease. Note that by running them at an angle, you still will have full coverage plus a little on each end to tuck up and pin covering the ends of the roll.


Once you've laid out a running 8" of slices, go back and interweave another set running the opposite direction. The ones on the ends will be really long, but you will weave these together after the roll is in place.


Place the roll in the center of weave, and take one end of the parchment and pull the weave over the roll.


Repeat the same with the other end, eventually weaving all the loose ends together, and pinning the bacon ends over the roll ends