Mostly about food, this blog is just a place for me to throw things that are of interest to me. I appreciate you taking the time to stop by an look around. This represents just some of the stops on the various pathways that this amateur home cook finds himself.

You may find that these foods tend toward protein and away from carbohydrates - this is due to diabetic issues, so I try to only sparingly use carbs, and good ones at that. Of course, sometimes I forget....

Feel free to drop me a line with any suggestions or just to let me know what you think. Thanks!

If you c


Search This Blog

A Little Navigation...

Yá át ééh!

I want to thank you for the time that you spend here, and hope that you can find useful things here.

Hagoonee'


Showing posts with label beef. Show all posts

Monday, August 20, 2012

Carne Guisada - Cooks in the Jar!

Mexican beef stew for your pressure canner – in a 1 qt Mason jar.


This is not intended to be a primer for home canning.  You should already be familiar with that.  Additionally, do NOT attempt to make this recipe using a water bath canner.  Although it may cook and seal the jars, you have NOT prevented the possibility of disease that way.  You MUST use a pressure canner for this.


INGREDIENTS
1 t pepper
1 t dried granulated garlic                                          
½ t beef bouillon granules
¾ t flour                                                                      
½ t dried granulated onion
¼ t cumin                                                                    
¼ t chile powder

1 lb beef – chuck|round|sirloin, no fat and gristle      
1 fresh jalapeno, medium dice
1 medium onion, medium chop                                 
1 bell pepper, medium chop
1 T tomato paste


METHOD

1.      Measure the first 7 ingredients into a bowl; mix together well.

2.      Cut beef into approximately 1” cubes.  Remove meat to a large bowl.  Add in mixed spices, stirring to coat all of the meat.  You want to gather up all the spice you can and coat the meat. 

3.      Add your prepped vegetables to bowl, and mix the entire contents together well.


4.      Using your canning funnel, fill a quart Mason jar to just over half-full.  Using a rubber or plastic tool, remove the air pockets. 

5.      Next add in the tomato paste, and continue filling the jar, tightly packing in the remaining ingredients but leaving a 1” head space.

6.      Clean jar rim, covering with lid and band as per good canning practice.

7.      Process in a pressure canner for 90 minutes at 10 psi.

 
If  you have prepared it correctly and have a good seal, you now have a nice meal already 
cooked that can be stored for up to a year on a shelf, ready to go!


8.      When you finally do open the jar, you will notice that there will be quite a bit of liquid,  Although packed without any added water, the meat and especially the vegetables produce quite a bit as they cook.  If serving over a starch like rice, this is a plus.  For use in tacos, for example, you might want to simmer this down to a thicker consistency.


Carne Guisada can be eaten as-is, served over rice, or even in flour tortillas as tacos.  Season it with more black pepper and some hot sauce and it is a mighty good meal!

Sunday, April 22, 2012

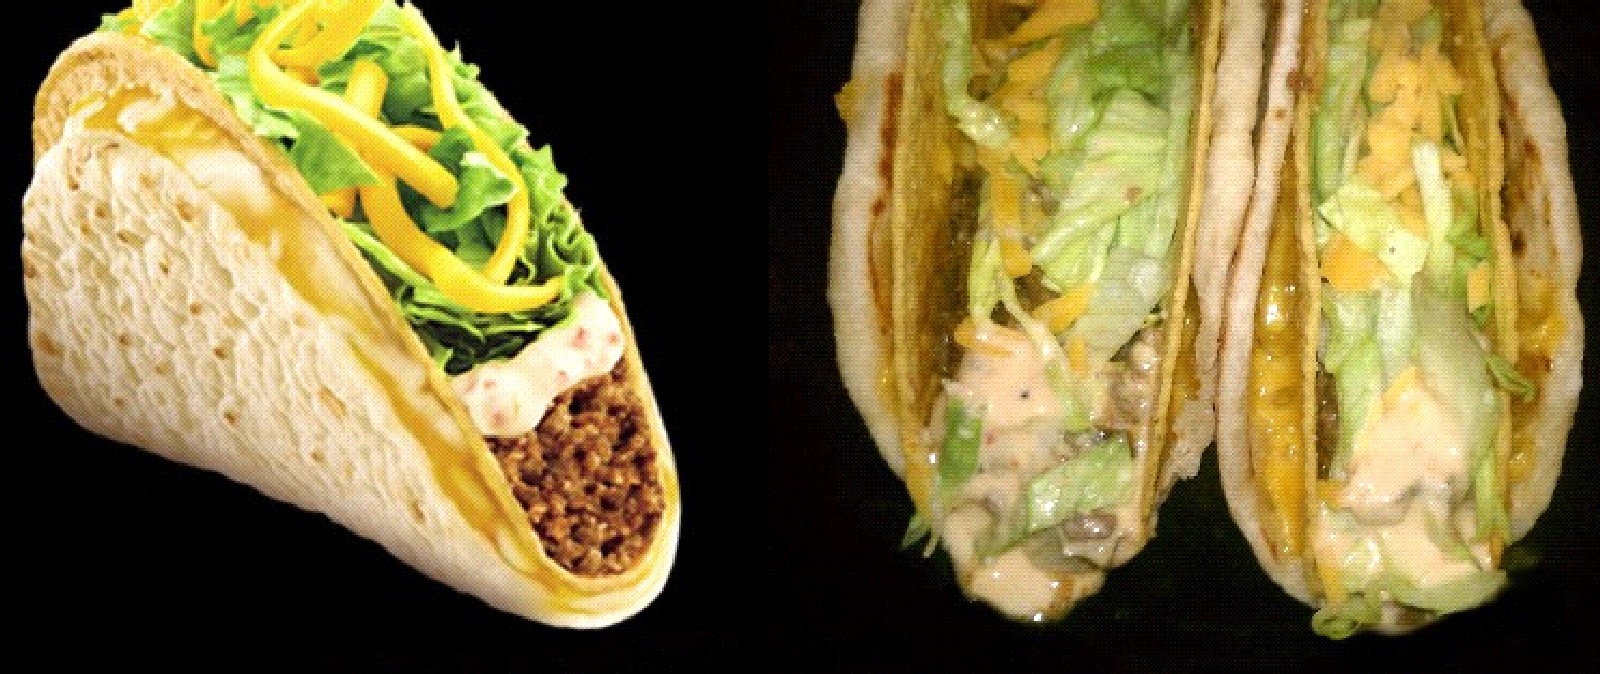
Taco Bell® Cheesy Gordita Crunch - Clone recipe


Warm, pillowy flatbread covered in a melted three-cheese blend, wrapped around a crunchy taco and topped with a zesty Pepper Jack sauce.”  So says the Taco Bell web site.   

Here’s my version - this is for Amanda!


My sauce is a little runny in the picture.  This comes from not refrigerating it before using it on the hot beef filling.  Don’t make the same mistake. Next time I make this I will replace with a better picture.  I am certainly no food stylist!  

Ingredients

  • 3 hard taco shells, pre-made is easier
  • 3 soft gordita tortillas (recipe here, or you can use thick flour tortillas or buy Gordita shells)
  • 1/4 cup EACH of shredded mozzarella, cheddar and Monterrey jack cheeses (or 3/4 cup of Mexican cheese blend)
  • 6oz Taco Bell clone beef recipe (recipe here)
  • Taco Bell Baja Pepper Jack Sauce clone (recipe here)
  • 1/2 cup finely shredded lettuce
  • ¼ cup of diced tomatoes (optional)
  • ¼ cup shredded cheddar cheese for topping

Method

1.      Gather your gorditas/tortillas.  Top each with about 1/4 cup (2 oz) shredded cheese in a thin even layer.  Warm these in the microwave until the cheese just melts, maybe 35-45 seconds depending on your microwave.

2.      Place a taco shell in the middle of the tortilla. Placing your fingers inside the hard shell, gently press the soft tortilla to the shell on each side until the melted cheese causes the sides of the heated tortillas to stick to the taco shells.  If you press too hard, you will break the hard shell, so be careful.  Let  these sit on there side for 20-30 seconds so the cheese can set. 

3.   Load as much taco meat into the shell as you like.  In the following order, layer in the chilled Baja Sauce clone, shredded lettuce, tomatoes (optional) and shredded cheddar cheese.

Monday, April 16, 2012

Best Ground Beef Taco Mix - so far...

This is what Taco Bell beef would taste like if it was really good!


I have been in search of a really good taco meat creation process for a while now, and it has been somewhat frustrating.  As those who know me will attest, I'd rather cook from scratch than use a lot of store bought items, so a packaged mix was out.  Most of the recipes I've seen either result in dried out meat, runny meat, or some wacko balance of flavors, so I had to come up with something of my own.  At least I know what's in it (and can pronounce all the ingredients!).  This is not your standard spice mix, but it adds up to one flavorful and moist change from the standard blah mix.  I also like those new store-bought taco shells that are flat on the bottom.  Not only will they stand up for filling, you can get more goodies in them!  Now go and bite some tacos!


INGREDIENTS
1 lb ground beef - 80/20 or leaner
2 Tablespoon all purpose flour
2 teaspoon chili powder
1/2 teaspoon onion powder
1/2 teaspoon garlic powder
1 teaspoon paprika
1 1/2 teaspoons dried onions
1/4 teaspoon cumin
1 t beef bullion powder
1/4 teaspoon sugar
1 1/2 teaspoons corn starch
1 dash cayenne – for flavor, not heat (optional)

1/2 cup water


METHOD
Mix the raw ground beef with all ingredients except water.   I have found the easy way to do this is in a quart size plastic zip bag – add the meat and spices, and squish it around until it is uniformly distributed.  Keeps the hands clean.


In a skillet over medium to medium-high heat, brown the beef mixture along with 1/4 cup water.  The key here is to break up all of the ground beef as it cooks so that there are no chunks.  You want it reduced to a fine and even texture.  You can see below that there is still some liquid to dispel.


As the mixture cooks, add the remaining water occasionally until all incorporated.  Keep stirring and cook the meat until the proper consistency is reached - soft, juicy and velvety.  You may have to evaporate some of the water, but don't drain it or you'll lose flavor.


Ideally, the texture should be very moist but not quite like a Sloppy Joe mix.  This way it won’t be dry, won’t be over cooked and will stay in your tacos.  All you need do is add some lettuce, tomatoes and cheese, and voila - TASTY!

Saturday, April 14, 2012

Picadillo


Picadillo has been a part of my life since I can remember.  Our housekeeper Santa in Laredo used to make it, and I’ve sampled it now and then my whole life.  It’s a very versatile dish, and can be used alone as a main course, or in tortillas as tacos, or on buns like Sloppy Joes.  I’ve even seen it mixed into cheese and used as a dip.  Anyway, everyone who makes seems to do so differently, and this is the recipe I am currently using.  The ingredient list is different and somewhat longer than many, but it really comes together well.  

Ingredients
  • 1½ pounds lean ground beef
  • 1 large onion, chopped
  • 1 can, or 1 lb, chopped/diced tomatoes
  • 3 large garlic cloves, crushed
  • 1 large potato (about 1 lb), 1/2-inch dice
  • ½ cup beef stock
  • 1 tablespoon apple cider vinegar
  • 1 chipotle chile/adobo sauce puree*, or canned chipotle chile with adobo sauce, chopped
  • 1 teaspoon ground cumin
  • ½ teaspoon sugar
  • 1½ teaspoon chili powder
  • ½ teaspoon salt
  • 1½ teaspoon caldo de res powder / granulated beef bouillon

Method

1. Brown the meat, onion and garlic. Drain, and then add everything else.
2. Simmer for half an hour, stirring occasionally. 
3. Add water or stock to keep from drying out if necessary. 
4. Serve warm with tortillas or as tacos.


*I take an entire can of chipotles in adobo and whir them up in a baby processor until they become a nice paste.  This will keep in the fridge nearly forever and is easy to measure.

Friday, October 7, 2011

Lone Star Stroganoff

Another one of those dishes that everyone has a recipe for, this has a couple of  twists that drag it south of the Mason-Dixon line and west of the Mississippi.  It has some fiery components, but is mild enough for all to enjoy.

Serves 6, or 4 really hungry folks.  Even less if you 'sample' it all afternoon... just sayin'.


Ingredients

3 lb chuck, top round or flat iron steak, trimmed of fat and gristle
2 medium onions - short julienned
1 1/2 lb Cremini (or button) mushrooms, cut into 1/2" thick slices
1/2 cup decent red wine
1 can consommé ( in soup aisle)
2 tablespoons flour
2 tablespoons tomato paste
4 oz. cream cheese, room temperature
1 large fresh jalapeño, minced fine
1 chipotle in adobo pepper, minced fine
1/2 cup chicken stock (can use water)
kosher salt and fresh ground pepper
8 oz. wide egg noodles


Method
Heat a large  skillet over medium heat.  Work your way through the the sliced mushrooms without crowding, this will take a few batches - see Beginning Mushrooms 101 for all you'll ever want to know about cooking mushrooms in a skillet.  When they are all done, remove them to a good-sized bowl for later.


While the mushrooms are cooking, it's time to prepare the meat.  Since you've lost all the fat and gristle, cut the meat into manageable strips, and then into smaller somewhat thin pieces.  This will help them both cook faster and be more tender.  Here you see me slicing across the grain at an angle, also helping to tenderize them. 


Dry the meat well with paper towels, and season liberally with salt and pepper.    If you don't dry it, it won't brown.  Set this aside for a few minutes while we do the onions.


The peeled onions ate cut into strips and the halved.  Put them into the skillet with a little olive oil and let them become translucent and a bit caramelized.


When done, remove the onions to a bowl and set aside.  Now we go back to our seasoned beef and add it to the pan a little at a time, taking care not to crowd it.  This will take a few batches to get it all done.  When you start to see the edges brown, you can start stirring it about.  It doesn't have to cook completely here, just brown. 

As each batch finishes, place the browned meat in with your mushrooms and pour out any liquid from the pan - it is the enemy of browning.


After all the meat is out, the onions head back in one last time, along with the wine and flour.  Whisk this together so that the flour is dissolved. Add in the consommé.


Then whisk in the tomato paste, and slowly, the cream cheese.  Most recipes for stroganoff call for sour cream, but I like the thickness that this brings to the sauce.  Whisk until this becomes uniformly smooth.


Retrieve your chipotle pepper dripping with adobo.  You will want to mince this very fine so it will melt into the sauce as it simmers.  Same goes for the jalapeno.


Time to go all in.  Add the meat and mushrooms into the sauce and stir well to incorporate.  Then add in the minced peppers and mix again.


You'll probably have to let this simmer for a couple of hours.  If it's too thick, add in the chicken stock to make sure all the ingredients get incorporated.  This will allow the meat to get really tender, and allow the sauce to thicken even more.  Of course, you'll have to sacrifice and actually taste a piece occasionally to make sure it is getting tender...

When it is about done cooking down, it is time to cook the noodles.  I prefer using the extra-wide egg noodles as their surface area can carry lots of sauce with each fork-full.  Cook them until al dente, then drain and plate them, then adding the stroganoff mixture.  Top it all with a dollop of sour cream, some sliced green onions and a sprinkle of chile powder.


¡Muy Sabroso!

Wednesday, October 5, 2011

Fajititos


Tired of the same old tacos, I figured it was time for an upgrade. 
Are they fajitas?  Maybe burritos?  The verdict? 

Muy yummy!  


Ingredients  
1/2 green bell pepper, cut into 1 1/2" strips
1/2 red bell pepper, cut into 1 1/2" strips
1/2 small to medium onion, cut into 1 1/2" strips
3 cloves garlic, finely minced
1 large or 2 small jalapeños, short julienne

1 lb.- 1 1/2 lb. beef, such as skirt steak, flank steak, top round - sliced thin for Asada cooking
kosher salt, coarse ground pepper
olive oil

4 fajita-size flour tortillas (reduced carb)
1/4 lb Mexican melting cheese, such as queso quesadilla or queso asadero, shredded

home-made red and green salsas 

Method
 Gather your ingredients.  Prepare all the different items by doing the slicing and mincing before you start cooking - see "mise en place".  Here's the starters...


Preheat your oven to 350°.  Add all the vegetables to a skillet, and sautée in a bit of oil until they soften and the onions become slightly translucent.  Remove to a plate and cover.  Now cut the beef into strips across the grain, season with pepper only and add them to the empty skillet with a touch more oil.  Cook until just browned - about half-cooked.  Lightly sprinkle with salt and then add the vegetbles back into the skillet and mix together. Oh how wonderful it would be to have a flat top at home!


Now take 1/4 of your meat/vegetable mixture and roll it in a flour tortilla that has been warmed slightly in the microwave to soften.  Repeat for the remaining filling.  Place these rolls seam side down in an oven proof dish lightly sprayed with your choice of a Pam-like product.  This will help them release for service.


Once the oven is hot, slide the dish onto the upper rack, and bake until the tortillas just start to brown.  At this point, kick the oven up to low broil, and pull the dish out to finish.


Top the rolls with the cheese you should have already shredded, and back on the top shelf they go, oven door left cracked open.  Watch carefully until the cheese starts to spot (like picture below), and remove from oven.  Turn the oven off - it's done it's duty for today.


Plate the Fajititos, two per hungry person, one if served with several sides.  Finish off the Fajititos with alternating stripes of red and green salsa, freshly made if available.  Serve with an appropriate side dish, here seen with refried beans with jalapeno bits added and topped with shredded cheese.  Serve hot!

Tuesday, September 20, 2011

Savory Texas Meatloaf


Everybody has a recipe for meatloaf.  Many people aren't happy with theirs, but are stuck in a rut.  Consider giving this one a try - there are a few tasty differences that make it mighty good.  And even better, it makes plenty, so there's lots left over for meatloaf sandwiches the next day!


Ingredients:
1 large onion, cut in small dice
1 carrot, cut in small dice
1 Poblano pepper, cut in small dice
3 tablespoons butter
2 teaspoons pepper
5 teaspoons minced garlic

2 lbs. ground beef, 80/20
1 lb. ground pork
1 lb. ground lamb

1 cup breadcrumbs, unseasoned, fresh preferred
1/2 cup milk
1/2 cup ketchup
3 eggs
1/2 cup (compressed) of finely chopped cilantro
1/2 cup chopped cooked bacon

1/2 cup ketchup
2 tablespoons Worcestershire sauce
2 teaspoons salt
2 teaspoons pepper


Method:

Combine the breadcrumbs and milk together to create a mush. Prepare the vegetables as directed above.


In a large skillet, add the first 5 ingredients and sauté until the vegetables soften.  When soft, add the garlic and stir in well, cooking 1 more minute.  Remove from stove and allow to cool.  Gather your defrosted meats - clockwise from left, beef, pork lamb:


In a large bowl, separate and scatter the meats evenly in the bowl.  You don't want to over-mix the meat mixture, as that will make your meatloaf tough.  Add in the cooled vegetables, milk /breadcrumb mush, ketchup, cilantro and the eggs.  Heat your oven to 350°.


Mix until all parts are evenly distributed and then let it rest.  Divide the mixture evenly between two loaf pans, taking care to make the center a little lower than the edges.  This will help to cut down on the tendency for cooked meatloaf to have a large center bulge.


Finally, scatter half of the bacon across the top of each loaf.  Now pop the loaf pans into your oven, and set the timer for 45 minutes.  Combine the last 4 ingredients into a Texas Tang sauce so that it will be ready for the next step.


After an hour, remove the loaf pans and set on a cooling rack, and remove the loafs from the pans.  Place the loafs on a larger rimmed pan, and divide the ketchup sauce evenly over the tops of the two loaves.  Below you see the loafs after having been sauced, and ready for the oven again.


 Below is an oblique shot, and you can make out how relatively flat the tops are.  This will help a lot with making meatloaf sandwiches later!


Pop them back in the oven for another 45 minutes, or until the internal temperature reaches 155°.  Don't overcook or it will start to dry out!  The jalapeño garnish is, of course, optional as are the Pintos-n-Pico on the side.


Saturday, September 10, 2011

DIY Meat, anyone?

On our last trip to Restaurant Depot, I was looking for something to replenish our dwindling beef supply at home. This trip, the nod went to to a whole untrimmed Inside Top Round. To quote from the the IMPS guide;
"This boneless item consists of the semimembranosus, sartorius, adductor, gracilis, and pectineus and is separated from the bottom round and knuckle through the natural seams. The iliopsoas may remain if firmly attached. All bones, cartilage, and exposed lymph glands shall be removed."
Here's what it looks like in a cryovac bag, on a full size 33" wide sheet pan. It's a big chunk of Choice grade Certified Angus Beef:
After removing the fat cap, I found that the clod was easily separated along the natural seams into a several large cuts and a few smaller trim pieces. Here is a shot of the large sections after reduction:

It's hard to tell from the picture, but there was a nice amount of intramuscular fat, so it should be fairly tender for such a typically lean piece of meat. I have already used some of the small trimmings in some carne asada, beef and some green chile and bean burritos. Very tender, very tasty, and can't wait to dive into some more!

Wednesday, August 17, 2011

Italian Wedding Soup, another rendition

Zuppa Di Matrimonio
There are as many recipes for Italian wedding soup as there are mothers-in-law in Italy. Most of the ones I have seen or sampled are quite tasty, but yet thin and watery. With this version, I have corrected that little problem and still kept the calorie count down. Buon appetito!

Ingredienti

2 qt. chicken stock/broth
1 tablespoon basil
2 teaspoons minced garlic
2 bay leaves
1 10 oz. box frozen spinach
1/2 cup Parmesan or Parmesan/Romano mix grated cheese
2 eggs
1 medium to large onion
1 lb. meatballs
8 oz. orzo pasta
salt & pepper


Instruzioni
Place the chicken stock, basil, bay leaves, garlic and about a teaspoon of pepper in a large dutch oven. Bring to a low boil over medium heat. Once boiling, add in the thawed chopped spinach and stir to incorporate.
Ina 2-cup measuring cup, add the 1/2 cup of grated cheese. Add the 2 eggs on top of the cheese (without any shell), and add enough water to bring the amount to 1 cup. Using a whisk or fork, thrash the resulting concoction until well mixed.
While stirring the pot vigorously, slowly drizzle in the egg/cheese mixture, a little at a time stirring it in well. We are trying to avoid having lumps of scrambled eggs here.
Take 1 medium to large onion, peel and give it a rough chop, as below. Add the onion and the meatballs into the pot, stirring a bit to have them evenly distributed.
Let's talk about meatballs. I have a few good recipes for meatballs, but I didn't have all I needed here to make them. I defaulted to using frozen Italian meatballs I had purchased from Costco. They are certainly not fresh, but they're pretty good. Next time I'll make the meatballs and post the chosen recipe on here for you all. In the mean time - experiment!

What you have now is something that should look like the picture below. Add in the 8 oz. of orzo pasta, mixing it in well. Bring to a boil, stir well, then reduce heat to low and cover. Let simmer 15-20 minutes until pasta is cooked through.
While you are waiting, chop up about a cup of parsley. I used curly leaf, but flat leaf is fine too.
Once everything is ready to eat, taste for salt and pepper, adjust,add in the chopped parsley and serve immediately.