Mostly about food, this blog is just a place for me to throw things that are of interest to me. I appreciate you taking the time to stop by an look around. This represents just some of the stops on the various pathways that this amateur home cook finds himself.

You may find that these foods tend toward protein and away from carbohydrates - this is due to diabetic issues, so I try to only sparingly use carbs, and good ones at that. Of course, sometimes I forget....

Feel free to drop me a line with any suggestions or just to let me know what you think. Thanks!

If you c


Search This Blog

A Little Navigation...

Yá át ééh!

I want to thank you for the time that you spend here, and hope that you can find useful things here.

Hagoonee'


Showing posts with label pork. Show all posts

Thursday, August 9, 2012

Putting up Canned Bacon!

Well, it will come to no surprise to those that know me that I would have learned yet another way to work with bacon.  Here you will see how I have learned, mostly from BexarPrepper, how to can bacon so that it can be safely stored without refrigeration.


I need to say that you MUST do this using a pressure canner, not a water bath canner.  There is no safe way to can meat products with boiling water, it must be done under pressure.  This article assumes that the reader is familiar with the process before attempting to duplicate it.  This bacon was in the canner at 10 psi for 90 minutes. 

First, you need parchment paper, and it definitely has to be parchment paper, NOT waxed paper.  They are two different things for different purposes.  What I have seen it comes in a 15" width. 

I started out by unrolling some parchment paper.  In the shot below, I have laid out the bacon flush with the bottom edge, and you can see that I have left a space at the left hand edge about the width of a slice of bacon.More on this space later.


Next, I have covered the bottom half of the the bacon with a piece of parchment the same length but cut down to half the width of the bacon strips.


Next, fold the flap on the left over the first piece of bacon, and then take the entire covered bottom half of the bacon layer and fold it up and over the exposed bacon, like this:
 

  Now, starting from the end without the fold, start rolling the bacon up, tucking it in to keep everything even and snug.  When finished, you will end up with something that looks like this:


Insert your bacon roll into a wide-mouth quart Mason jar, bacon end first, and then push the rest of the parchment paper in before applying the lid and band.  Don't add any liquid to the jar, as the bacon will give off both bacon grease and water as it cooks in the canner.


When you do open, you will be presented with some soft-cooked bacon, which you can eat as is or cook longer to your desired degree of done-ness.  As a bonus, you will also have all of that wonderful bacon grease that was rendered from the canning process for cooking with as well.  Win-win!

Saturday, May 26, 2012

Morning Air

Sometimes a little extra effort can make a nicely different treat.  I decided to whip up something light and yet tasty for the Lady of the House this morning and the result was a very light and tasty Morning Air.


Ingredients
6 eggs
1/4 tsp cream of tartar
6 strips of bacon. cooked and chopped
3/4 cup shredded cheese, cheddar or a favorite blend
4-6 mushrooms, sliced and sauteed in the bacon greased pan used above
2 scallions, white and green parts both sliced
salt and pepper to taste


Method
Carefully crack and separate the eggs, whites and yolks, into two large bowls.  It is critical that you don't get any of the yolk into the bowl of whites, so you might want to do the eggs one at a time into a smaller bowl, and then pour in the large bowls.

Place 2 8" non-stick skillets on the stove over medium heat.  I sprayed mine with some oil spray just to make sure they stayed non-stick.

Using a simple hand mixer, whip the egg whites until frothy, then add in the cream of tartar to really build some volume.  Once completed, start in on the bowl of egg yolks.  These will not rise nearly the same amount as the whites.  Now, with the mixer on low, add spoonfuls of the white mixture into the yolks and mix to incorporate.  Do not let the spoon touch the yolks.  Keep this up until you have about the same volume in both bowls.


Next, when the skillets are warm, place the whipped whites into one and the whipped yolk mixture into the other. If you can, level out the top of the whites.


Pre-heat the oven to 350°.  After 4-5 minutes, run a thin spatula around the edge of the whites, making sure that the mass has not stuck and is free to move.  Do the same for the yolks.  Place the skillets in the oven for 4-5 minutes until the mixtures have set - you will have to do the toothpick test like a cake.  In this case, if it comes out still a bit wet, that's okay.  Remove the skillets from the oven.  Although they will fall a little, they will retain a lot of air making this a light and fluffy egg dish.

Slide the egg white layer out of the skillet onto a plate.  Top with 1/4 cup of the cheese and about 2/3 of the the nice chopped bacon. 


Next, apply a layer of your sauteed mushrooms.  Add another 1/4 cup of shredded cheese to hold it all together


Microwave for 30-45 seconds until the cheese just starts to melt.  Remove from microwave, and invert the egg yolk pan over the plate.  Top with the remaining cheese and bacon.  Pop back in the microwave until the top cheese starts to melt. 


Top with sliced scallions, slice like a pie, and serve!


Thursday, May 17, 2012

Chilorio - not your local Tex Mex


This dish comes from the Mexican state of Sinaloa, on Mexico's west coast - the most famous town in it being Mazatlán. Thence comes Chilorio, part carnitas and part flavorful chile sauce. You can make the chile sauce as described below, or you can use my regular version. If you use this one, add some hot sauce to the mix as it is quite mild.

When distilled to simplest terms, it is long-braised pork infused in a chile sauce. As such in reality you can use whatever flavors you like in cooking the pork, and whatever mix of chiles you like in the chile sauce. Here is a pretty good start!

Ingredients
2.5 - 3  lb         pork butt (shoulder), cut into 2-3” chunks
1          cup      orange juice
1/2       cup      vinegar
1          cup      water , plus enough to cover eat
1          tsp       salt
4          ea         ancho chiles, dried
1          ea         chipotle pepper plus ½ tsp adobo sauce
6          ea         pasilla chiles, dried
6          ea         guajillo chiles, dried
6          clove    garlic
1/2       tsp       cumin
1          tsp       oregano, preferably Mexican
1/4       cup      parsley
1          tsp       black pepper
1          cup      chile soaking liquid
1/2       tsp       ground coriander
1/2       cup      fat; can be oil but lard or bacon fat preferred
1          ea         medium onion, julienned


Method

Cut the meat up and rinse well.  Place rinsed meat chunks in an large Dutch oven or heavy pot. Pour the orange juice and vinegar over the meat, and adding 1 cup of water plus enough to cover meat.  Add a teaspoon of salt and set over high heat. Once it comes to a boil bring the heat down to medium and let it simmer for about 40 to 45 minutes, or until most liquid has cooked off and the meat is thoroughly cooked and has rendered most of its fat.

Meanwhile, remove stems from chiles, make a slit down their sides and remove their seeds and veins. Place them in a bowl, barely cover them with 3 cups boiling hot water and let them sit and rehydrate for about 15 minutes. Place chiles and 1½ cup of their soaking liquid in the blender along with the garlic, parsley, oregano, cumin, black pepper, vinegar, and puree until your chile sauce is smooth.

Once the meat is ready, place it in a bowl along with any remaining cooking broth. Once it is cool enough to handle, shred it with your hands or using two forks. Drain shredded pork on paper towels.

In the same large cooking pot, heat your fat of choice over medium heat. Add the onion and cook until just translucent, then add the pork back in and heat throughout.


Next, pour in the chile sauce and coriander and let it season and simmer 4 to 5 minutes. Toss in the shredded meat along with any of its remaining cooking broth. Sprinkle in 1/4 teaspoon salt and let it cook, stirring often, until the meat has absorbed most of the chile sauce, which will have thickened, seasoned and changed color to a much darker tone.  It will take around 20 minutes. Salt and pepper to taste.

 
Serve with warmed flour tortillas on the side. You can also use the chilorio in tortillas and roll them into burritos. Below are tortillas and refried beans, along with your choice of guacamole, chilorio, sour cream and pico de gallo.  Doesn't get much better than this!


Wednesday, May 16, 2012

Pulled Pork Chiles Rellenos with Red Chile Sauce


Ingredients
4 large Poblano chiles
3⁄4 lb. smoked pulled pork
1 4 oz. can diced green chiles
1 1⁄4 cups cooking olive oil
1⁄2 red onion, diced
1⁄2 cup Monterrey jack cheese, grated
Salt and freshly ground black pepper
1 cup flour
3 eggs
1/2 cup home made red chile sauce, recipe here


Method
Place a rack about 4 inches from the broiler element and preheat. Lay chiles on a baking sheet in a single layer and broil, turning once, until they just begin to blacken and blister, about 5-7 minutes on each side. Put the chiles in either a closed paper bag or to a large bowl and cover tightly with plastic wrap. Let the chiles steam for 20 minutes or so. Peel off and discard the charred skin from of chiles, leaving the stem attached. Using a small knife, make a 2"long lengthwise slit near the top of each chile to form a pocket, and carefully remove the seeds without making the slit any longer. Set the chiles aside and allow them to cool.

Add the chopped onion and a little oil to a medium skillet over medium heat and sauté until softened, but do not caramelize.  Add in the chopped green chiles, and after mixing with the onions add in the pulled pork and enough liquid to make a moist filling.  Heat until well-combined, stirring occasionally. Transfer the filling to a large bowl. Let it cool slightly, and then add in the cheese, season with salt and pepper to taste, and stir to combine.


Stuff each chile with the mixture. Set chiles aside.  Put flour into a wide, shallow dish, and put the eggs into a large bowl and beat until well blended. Heat the remaining oil in a large nonstick skillet over medium-high heat.


Two at a time, dredge the chiles in flour, shaking off excess, then dredge in egg mixture, then back in flour and transfer to skillet. Fry chiles until golden brown on all sides, about 8 minutes total. Transfer chiles to a paper towel–lined plate to let drain.

 
Sprinkle with salt. Serve immediately, topped with red chile sauce and shredded cheese.

SERVES 4

Tuesday, September 20, 2011

Savory Texas Meatloaf


Everybody has a recipe for meatloaf.  Many people aren't happy with theirs, but are stuck in a rut.  Consider giving this one a try - there are a few tasty differences that make it mighty good.  And even better, it makes plenty, so there's lots left over for meatloaf sandwiches the next day!


Ingredients:
1 large onion, cut in small dice
1 carrot, cut in small dice
1 Poblano pepper, cut in small dice
3 tablespoons butter
2 teaspoons pepper
5 teaspoons minced garlic

2 lbs. ground beef, 80/20
1 lb. ground pork
1 lb. ground lamb

1 cup breadcrumbs, unseasoned, fresh preferred
1/2 cup milk
1/2 cup ketchup
3 eggs
1/2 cup (compressed) of finely chopped cilantro
1/2 cup chopped cooked bacon

1/2 cup ketchup
2 tablespoons Worcestershire sauce
2 teaspoons salt
2 teaspoons pepper


Method:

Combine the breadcrumbs and milk together to create a mush. Prepare the vegetables as directed above.


In a large skillet, add the first 5 ingredients and sauté until the vegetables soften.  When soft, add the garlic and stir in well, cooking 1 more minute.  Remove from stove and allow to cool.  Gather your defrosted meats - clockwise from left, beef, pork lamb:


In a large bowl, separate and scatter the meats evenly in the bowl.  You don't want to over-mix the meat mixture, as that will make your meatloaf tough.  Add in the cooled vegetables, milk /breadcrumb mush, ketchup, cilantro and the eggs.  Heat your oven to 350°.


Mix until all parts are evenly distributed and then let it rest.  Divide the mixture evenly between two loaf pans, taking care to make the center a little lower than the edges.  This will help to cut down on the tendency for cooked meatloaf to have a large center bulge.


Finally, scatter half of the bacon across the top of each loaf.  Now pop the loaf pans into your oven, and set the timer for 45 minutes.  Combine the last 4 ingredients into a Texas Tang sauce so that it will be ready for the next step.


After an hour, remove the loaf pans and set on a cooling rack, and remove the loafs from the pans.  Place the loafs on a larger rimmed pan, and divide the ketchup sauce evenly over the tops of the two loaves.  Below you see the loafs after having been sauced, and ready for the oven again.


 Below is an oblique shot, and you can make out how relatively flat the tops are.  This will help a lot with making meatloaf sandwiches later!


Pop them back in the oven for another 45 minutes, or until the internal temperature reaches 155°.  Don't overcook or it will start to dry out!  The jalapeño garnish is, of course, optional as are the Pintos-n-Pico on the side.


Monday, June 13, 2011

A moment of silence...

R.I.P.

I have searched high and low, and apparently this is the LAST of the home-made sausage from the freezer. The bratwurst is all gone; the Polish sausage is all gone; the breakfast pan sausage is all gone - above is I believe our last package of home made chorizo. Mourn with me as it is slowly devoured here at Casa Gordita over the coming days, and rejoice that the planning for the next sausage day is in the works!

Tuesday, May 31, 2011

Medallion Masterpiece

It's What's for Dinner:
Tonight we shared Medallions Four Ways. Beef fillet, pork tenderloin, chicken breast and large sea scallop - each bacon-wrapped and grilled, served over a grilled Portobello mushroom cap and accompanied by sautéed mushrooms, peppers and onions. Well, at least there's no carbs...

Pulled Pork / Hatch Chile Enchiladas

American Cross-Cultural Cuisine

This easy to make and yet very satisfying dish combines arguably the some of the best food contributions from North Carolina and New Mexico, and in very little time, makes a creamy and delicious meal.


Ingredients:
1 lb pulled pork, already smoked and shredded
6 each Hatch chiles, roasted, seeded and peeled (can substitute 2 each 4 oz. cans)
12 corn tortillas
1 tsp ground black pepper
2 cloves garlic, minced fine (can substitute 1/2 tsp granulated garlic)
1 pint green enchilada sauce (recipe follows) (can substitute 1 can sauce)
12 oz. shredded queso quesadilla cheese (can substitute mozzarella)
4 oz roasted red pepper, peeled, chopped and seeded


Method:


First, here's a look at some raw materials. Below is one fresh-off-the-smoker pork butt:


One pound of pulled pork and the diced up peppers, all getting acquainted in the pan. Here's where the ground pepper and garlic are added.


This paragraph below is good info:
Tortillas - a new process. Corn tortillas are notoriously fragile when new. Try and fold them too much and they crack and crumble. The common solution is to pass them through either hot oil or simmering sauce to make them pliable without tearing. There's a better, faster, easier and calorie-free way to do this. Take the corn tortillas and put them in a tortilla warmer, and run them in the microwave for 30 seconds. Turn them over and run again for another 30 seconds. This in effect 'steams' them, making them easily rolled without tearing. Don't have a tortilla warmer? Take a clean dish towel, wet it and then wring it out well. Wrap your tortillas loosely in this instead, and follow the above directions.

Preheat your oven to 350°. Next, pour a bit of your enchilada sauce in to the bottom of your baking dish and tilt to cover the entire bottom.

Divide your filling into 12 equal little bundles in your pan. One at a time, distribute a bundle evenly across one of the steamed tortillas as shown below. Now roll it up away from you just snugly enough to keep it all together.

Here's what they look like in the pan after all 12 have been rolled:


Top with the rest of your enchilada sauce and a good layer of the shredded cheese:

Twenty minutes later, the oven has worked it's magic and the the taste buds are working overtime:

Here you see a serving of 3 enchiladas, plated up and accented with some chopped roasted red peppers. This dish has a little tang to it but is certainly not loaded with heat. this has been given the Kathy seal of approval to be added to the "make it again" list.


Salsa Verde for Enchiladas

Ingredients:

1 pound tomatillos, husked, rinsed, coarsely chopped
4 Hatch peppers - roasted, peeled and seeded (can substitute Poblano)
1/2 cup cilantro, without stems
4 cloves garlic, roughly chopped
1/2 medium onion, diced
1 tablespoon lime juice
chicken broth
Salt


Method:
Add the first 5 ingredients together in a blender and pulse together.

Add chicken stock (if necessary) a little at a time just so it will blend. Once smooth, remove to a sauce pan and heat to a low boil.

Reduce to a simmer for 30 minutes or so, check consistency, and adding chicken stock as needed to thin. Add salt to taste.

Right before serving, stir in lime juce to incorporate.

Depending on chicken stock used, makes about 4 cups.

Monday, February 28, 2011

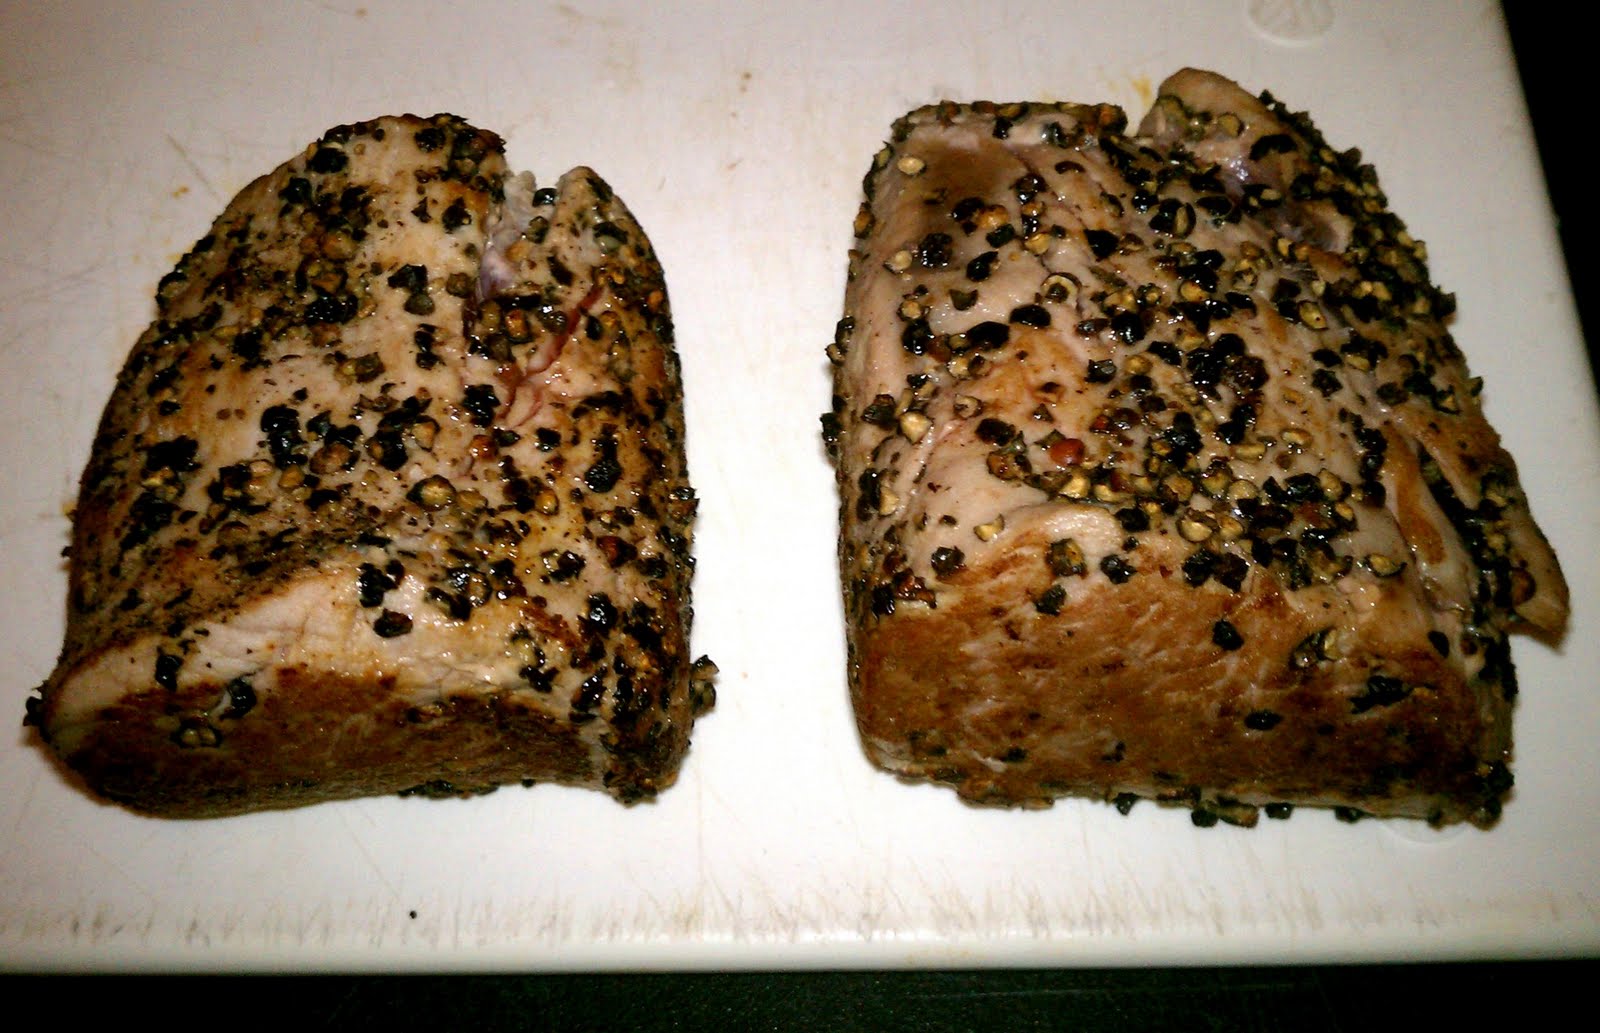
Pepper Loins

Another adventure - the product of "what's in the fridge"?
Bear with me and you'll soon see what I mean...


Random stuff from fridge and pantry:
1 pork loin
half-cracked peppercorns
1 lb Crimini mushrooms, sliced (reserve in two parts)
1/2 cup sherry
1/2 cup port
1/2 t tarragon
1/4 t dill

1 Roma tomato, diced
mozzarella cheese, diced
vinegar & extra virgin olive oil
Peccorino Romano cheese
salt & pepper

1 lb red potatoes
sour cream
garlic powder
parsley flakes


Method
Put about a pound of red potatoes in water and start them to boil until soft. Or use a package of instant mashed red potatoes, your choice.

In a small saucepan, combine the wines, tarragon and dill and bring to a fast simmer. The goal here is to reduce it by 2/3.

Heat a large cast iron skillet to medium-hot. Add in one-half of the sliced Crimini mushrooms and toast to cook in the dry pan - do not add oil. you will see them shrink, be sure to turn halfway through the process when the mushrooms just start to color. Once they are done, mix them in with the reduced wine sauce and cover over low heat to keep warm.

While all that is underway,

Set the oven to 350°. Trim all silver skin from the pork loin, and section out two nice 4 oz. portions. Reserve the rest for another use. Roll the pork loins in cracked peppercorns until lightly crusted, then sear them to a nice light crustiness.


Place the loins on a pan on the center rack, for about 10 minutes, or until your Thermopen registers an internal temp of 135°. Remove from oven, cover with foil, and rest for 10 minutes.

Once you drain your cooked potatoes well, mash them, leaving skins on. Mix in a couple of tablespoons of sour cream and a dash or two of garlic powder, incorporating well. Let sit for flavors to meld.

While all this is going on, take you sliced your Crimini mushrooms, Roma tomato and mozzarella cheese and mix together with the vinegar and oil and salt and pepper as a dressing (you can also use Italian dressing). Once mixed, plate and lightly top with the Romano cheese.

Plate the potatoes, then plate your rested pork loin and top with the mushroom & wine reduction. Voila!


New ways to use leftovers - tasty and thrifty.

Sunday, February 27, 2011

Brother-in-Law Ribs

We hadn’t seen Kathy’s brother Larry in a couple of years, so when he made it down to the Hill Country the other day, I wanted to put up something yummy.


We had seared and oven braised ribs, a nice sausage potato salad and a mixed greens salad with chopped veggies. Come back any time!


Thursday, July 29, 2010

Wrap them Loins!

Momma's home, and hungry. Need some quick and tasty eats. I decided to pull together ideas from three different dishes and produce some eats.

I started with a pork tenderloin, all silver skin and fat removed. It was wrapped in a spiral bacon weave, with the bacon woven all the way around, not just wrapped, with toothpicks holding the ends down. It was then seasoned with a commercial seasoning which I received in a Brethren trade. Very nice stuff! Here it is pre-seasoning:


On the grill, doing all sides until the bacon is cooked. After that, it was moved to the cooler side to finish cooking.


Resting on the cutting board. It was pulled at an internal temp of 138°. Final internal was 146°.


A sliced pic (blurry - sorry). Very juicy, hard to keep from eating it right off the board!


Served up with a baked potato carrying butter, bacon salt, pepper and minced cilantro:


Here's the seasoning I used. It has a terrific flavor profile, but not really any heat. This is a good thing, as you can add chili/cayenne powder to make your desired heat level. It's just hard to find!