Mostly about food, this blog is just a place for me to throw things that are of interest to me. I appreciate you taking the time to stop by an look around. This represents just some of the stops on the various pathways that this amateur home cook finds himself.

You may find that these foods tend toward protein and away from carbohydrates - this is due to diabetic issues, so I try to only sparingly use carbs, and good ones at that. Of course, sometimes I forget....

Feel free to drop me a line with any suggestions or just to let me know what you think. Thanks!

If you c


Search This Blog

A Little Navigation...

Yá át ééh!

I want to thank you for the time that you spend here, and hope that you can find useful things here.

Hagoonee'


Showing posts with label tips. Show all posts

Saturday, January 17, 2015

Guilt-Free Pizza!

If you like pizza, but don't like the crust - or even if you like the crust but don't want all the calories and carbohydrates, this is for you!  Of course, you have to like mushrooms...

First, prepare the toppings you'll be adding to your meal.  Below there are two kinds of olives, two different peppers, onions and diced bacon bits.  Yes, REAL bacon.  Not shown are the sauce and mozzarella cheese. 


Of course, you'll need a base for your "pie".  On your baking sheet, lay out a matrix of mushroom caps from which you have carefully removed the stems.  Save the stems for use in another dish!  These happen to be Cremini mushrooms about 2" across, but any size will work, and the more alike in size they are the better.  White mushrooms will also work fine this way.


Fill each mushroom cap with a treasure trove of the diced bacon,  Cant have too much, and it makes sure every bite has some great bacon taste.

 Next, on goes the  sauce.  As thisk as it is, it will spread in the oven so you don't need a whole bunch.  Also remember that the mushrooms will give off liquid as they bake in the oven as well.


Mozzarella cheese time.  No need to be stingy, as whatever melts off is delicious in it's own right.  You'll see later.


Now, layer on your toppings.   I tried to keep them fairly even, but oh well.  If you get them too close to the edges, they will just slide off with the cheese.


Into the oven at 400° to finish.  You'll want to leave it in there until the veggies are done and the cheese starts to brown around the edged, as shown below.  After you serve up the mushroom pizzas, that crispy-edged cheese is a real guilty pleasure to snack on!


Here you go, plated and reaty to devour.  Note:  These are a lot more filling than you might think, I only ate 4 of them.  Hope you give this a try, and see how you like this way low carb version of your favorite pizza!


Monday, August 20, 2012

Carne Guisada - Cooks in the Jar!

Mexican beef stew for your pressure canner – in a 1 qt Mason jar.


This is not intended to be a primer for home canning.  You should already be familiar with that.  Additionally, do NOT attempt to make this recipe using a water bath canner.  Although it may cook and seal the jars, you have NOT prevented the possibility of disease that way.  You MUST use a pressure canner for this.


INGREDIENTS
1 t pepper
1 t dried granulated garlic                                          
½ t beef bouillon granules
¾ t flour                                                                      
½ t dried granulated onion
¼ t cumin                                                                    
¼ t chile powder

1 lb beef – chuck|round|sirloin, no fat and gristle      
1 fresh jalapeno, medium dice
1 medium onion, medium chop                                 
1 bell pepper, medium chop
1 T tomato paste


METHOD

1.      Measure the first 7 ingredients into a bowl; mix together well.

2.      Cut beef into approximately 1” cubes.  Remove meat to a large bowl.  Add in mixed spices, stirring to coat all of the meat.  You want to gather up all the spice you can and coat the meat. 

3.      Add your prepped vegetables to bowl, and mix the entire contents together well.


4.      Using your canning funnel, fill a quart Mason jar to just over half-full.  Using a rubber or plastic tool, remove the air pockets. 

5.      Next add in the tomato paste, and continue filling the jar, tightly packing in the remaining ingredients but leaving a 1” head space.

6.      Clean jar rim, covering with lid and band as per good canning practice.

7.      Process in a pressure canner for 90 minutes at 10 psi.

 
If  you have prepared it correctly and have a good seal, you now have a nice meal already 
cooked that can be stored for up to a year on a shelf, ready to go!


8.      When you finally do open the jar, you will notice that there will be quite a bit of liquid,  Although packed without any added water, the meat and especially the vegetables produce quite a bit as they cook.  If serving over a starch like rice, this is a plus.  For use in tacos, for example, you might want to simmer this down to a thicker consistency.


Carne Guisada can be eaten as-is, served over rice, or even in flour tortillas as tacos.  Season it with more black pepper and some hot sauce and it is a mighty good meal!

Thursday, August 9, 2012

Putting up Canned Bacon!

Well, it will come to no surprise to those that know me that I would have learned yet another way to work with bacon.  Here you will see how I have learned, mostly from BexarPrepper, how to can bacon so that it can be safely stored without refrigeration.


I need to say that you MUST do this using a pressure canner, not a water bath canner.  There is no safe way to can meat products with boiling water, it must be done under pressure.  This article assumes that the reader is familiar with the process before attempting to duplicate it.  This bacon was in the canner at 10 psi for 90 minutes. 

First, you need parchment paper, and it definitely has to be parchment paper, NOT waxed paper.  They are two different things for different purposes.  What I have seen it comes in a 15" width. 

I started out by unrolling some parchment paper.  In the shot below, I have laid out the bacon flush with the bottom edge, and you can see that I have left a space at the left hand edge about the width of a slice of bacon.More on this space later.


Next, I have covered the bottom half of the the bacon with a piece of parchment the same length but cut down to half the width of the bacon strips.


Next, fold the flap on the left over the first piece of bacon, and then take the entire covered bottom half of the bacon layer and fold it up and over the exposed bacon, like this:
 

  Now, starting from the end without the fold, start rolling the bacon up, tucking it in to keep everything even and snug.  When finished, you will end up with something that looks like this:


Insert your bacon roll into a wide-mouth quart Mason jar, bacon end first, and then push the rest of the parchment paper in before applying the lid and band.  Don't add any liquid to the jar, as the bacon will give off both bacon grease and water as it cooks in the canner.


When you do open, you will be presented with some soft-cooked bacon, which you can eat as is or cook longer to your desired degree of done-ness.  As a bonus, you will also have all of that wonderful bacon grease that was rendered from the canning process for cooking with as well.  Win-win!

Saturday, May 26, 2012

Morning Air

Sometimes a little extra effort can make a nicely different treat.  I decided to whip up something light and yet tasty for the Lady of the House this morning and the result was a very light and tasty Morning Air.


Ingredients
6 eggs
1/4 tsp cream of tartar
6 strips of bacon. cooked and chopped
3/4 cup shredded cheese, cheddar or a favorite blend
4-6 mushrooms, sliced and sauteed in the bacon greased pan used above
2 scallions, white and green parts both sliced
salt and pepper to taste


Method
Carefully crack and separate the eggs, whites and yolks, into two large bowls.  It is critical that you don't get any of the yolk into the bowl of whites, so you might want to do the eggs one at a time into a smaller bowl, and then pour in the large bowls.

Place 2 8" non-stick skillets on the stove over medium heat.  I sprayed mine with some oil spray just to make sure they stayed non-stick.

Using a simple hand mixer, whip the egg whites until frothy, then add in the cream of tartar to really build some volume.  Once completed, start in on the bowl of egg yolks.  These will not rise nearly the same amount as the whites.  Now, with the mixer on low, add spoonfuls of the white mixture into the yolks and mix to incorporate.  Do not let the spoon touch the yolks.  Keep this up until you have about the same volume in both bowls.


Next, when the skillets are warm, place the whipped whites into one and the whipped yolk mixture into the other. If you can, level out the top of the whites.


Pre-heat the oven to 350°.  After 4-5 minutes, run a thin spatula around the edge of the whites, making sure that the mass has not stuck and is free to move.  Do the same for the yolks.  Place the skillets in the oven for 4-5 minutes until the mixtures have set - you will have to do the toothpick test like a cake.  In this case, if it comes out still a bit wet, that's okay.  Remove the skillets from the oven.  Although they will fall a little, they will retain a lot of air making this a light and fluffy egg dish.

Slide the egg white layer out of the skillet onto a plate.  Top with 1/4 cup of the cheese and about 2/3 of the the nice chopped bacon. 


Next, apply a layer of your sauteed mushrooms.  Add another 1/4 cup of shredded cheese to hold it all together


Microwave for 30-45 seconds until the cheese just starts to melt.  Remove from microwave, and invert the egg yolk pan over the plate.  Top with the remaining cheese and bacon.  Pop back in the microwave until the top cheese starts to melt. 


Top with sliced scallions, slice like a pie, and serve!


Sunday, April 22, 2012

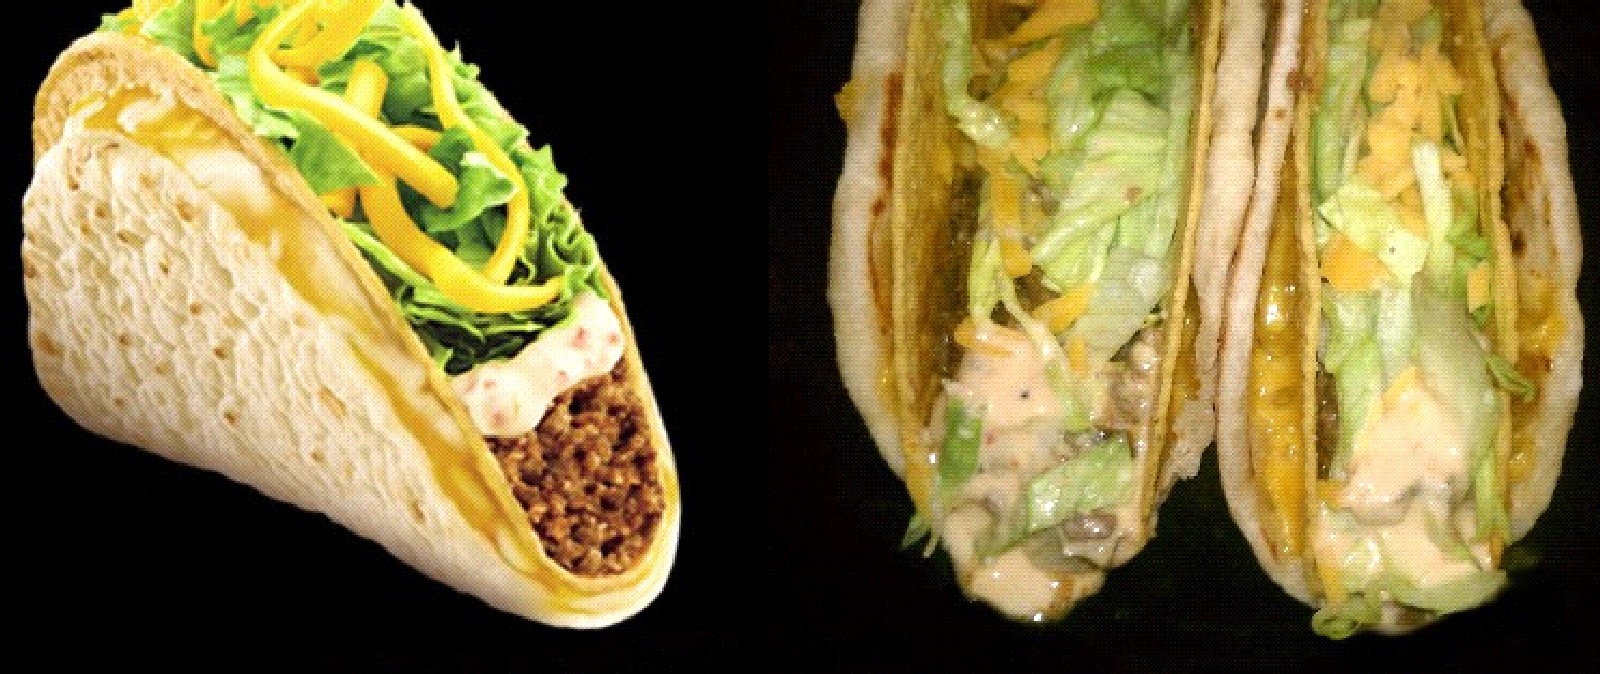
Taco Bell® Cheesy Gordita Crunch - Clone recipe


Warm, pillowy flatbread covered in a melted three-cheese blend, wrapped around a crunchy taco and topped with a zesty Pepper Jack sauce.”  So says the Taco Bell web site.   

Here’s my version - this is for Amanda!


My sauce is a little runny in the picture.  This comes from not refrigerating it before using it on the hot beef filling.  Don’t make the same mistake. Next time I make this I will replace with a better picture.  I am certainly no food stylist!  

Ingredients

  • 3 hard taco shells, pre-made is easier
  • 3 soft gordita tortillas (recipe here, or you can use thick flour tortillas or buy Gordita shells)
  • 1/4 cup EACH of shredded mozzarella, cheddar and Monterrey jack cheeses (or 3/4 cup of Mexican cheese blend)
  • 6oz Taco Bell clone beef recipe (recipe here)
  • Taco Bell Baja Pepper Jack Sauce clone (recipe here)
  • 1/2 cup finely shredded lettuce
  • ¼ cup of diced tomatoes (optional)
  • ¼ cup shredded cheddar cheese for topping

Method

1.      Gather your gorditas/tortillas.  Top each with about 1/4 cup (2 oz) shredded cheese in a thin even layer.  Warm these in the microwave until the cheese just melts, maybe 35-45 seconds depending on your microwave.

2.      Place a taco shell in the middle of the tortilla. Placing your fingers inside the hard shell, gently press the soft tortilla to the shell on each side until the melted cheese causes the sides of the heated tortillas to stick to the taco shells.  If you press too hard, you will break the hard shell, so be careful.  Let  these sit on there side for 20-30 seconds so the cheese can set. 

3.   Load as much taco meat into the shell as you like.  In the following order, layer in the chilled Baja Sauce clone, shredded lettuce, tomatoes (optional) and shredded cheddar cheese.

Monday, September 19, 2011

Finally!

Help for those counting carbs - whether for weight or diabetes.


I try to avoid eating a lot of carbohydrates (except on special occasions), as they induce a pretty psychotic effect on my blood sugar. I do okay at dodging most of them, but the lowly flour tortilla has been my Achilles heel. I still eat them occasionally, but I need to do better. This brings us to the present.

After looking around a bit at the grocery store this past weekend, I came across this pair of offerings. Now, I've had low carb and wheat tortillas before, and to be blunt they were all pretty horrible - dry, stiff, pasty and coarse. It had been a while, so I thought I'd try again. Both of these offering were good enough that I'd even served them to company. They are both made from wheat flour, although only the Mission brand tortillas appear a little tan. The texture is wonderful, being soft and supple and not at all like cardboard. Compare these carb numbers to the flour tortillas in your pantry and see how all that fiber reduces the net effective carbohydrates in these guys..

Santa Fe 'Carb Chopper' 7" tortillas:
70 calories - 2.5g fat, 7g carbs, 3g fiber, 4g net effective carbs, 4g protein


Mission 'Carb Balance' 6" tortillas:
80 calories - 2g fat, 13g carbs, 10g fiber, 3g net effective carbs, 3g protein


These will cost you more than regular store brand tortillas, but the quality you'll taste is worth it. I still say that if you don't have to worry about carbohydrates, then seek out 'Mi Casa' tortillas, as they're about hte best sore brand torts I've found.

Saturday, September 10, 2011

DIY Meat, anyone?

On our last trip to Restaurant Depot, I was looking for something to replenish our dwindling beef supply at home. This trip, the nod went to to a whole untrimmed Inside Top Round. To quote from the the IMPS guide;
"This boneless item consists of the semimembranosus, sartorius, adductor, gracilis, and pectineus and is separated from the bottom round and knuckle through the natural seams. The iliopsoas may remain if firmly attached. All bones, cartilage, and exposed lymph glands shall be removed."
Here's what it looks like in a cryovac bag, on a full size 33" wide sheet pan. It's a big chunk of Choice grade Certified Angus Beef:
After removing the fat cap, I found that the clod was easily separated along the natural seams into a several large cuts and a few smaller trim pieces. Here is a shot of the large sections after reduction:

It's hard to tell from the picture, but there was a nice amount of intramuscular fat, so it should be fairly tender for such a typically lean piece of meat. I have already used some of the small trimmings in some carne asada, beef and some green chile and bean burritos. Very tender, very tasty, and can't wait to dive into some more!

Thursday, September 8, 2011

Stuffed Portobellos with Prosciutto-wrapped fresh Asparagus


Ingredients
• 2 Portobello mushrooms
• 1 T plus 2 teaspoons extra-virgin olive oil, plus more for drizzling
• 6 oz. ground lamb
• 2 oz. Mexican chorizo
• 1/3 cup combined finely chopped onion & bell pepper
• 2 t minced garlic
• 1/3 cup combined bread crumbs & grated Parmesan cheese
• 1/4 cup minced fresh cilantro
• 1/2 t BBQ rub
• 1 egg, lightly beaten
• Balsamic vinegar, for drizzling

• 1 lb. fresh asparagus
• 1 Portobello, stemmed, gilled and cut into strips
• 2 slices thin Prosciutto de Parma
• kosher salt & fresh ground pepper

Method:
Preheat the oven to 400 degrees F. Prepare the Portobello mushrooms by removing the stem and then gently scraping out the brown gills. Clean and finely mince stem; discard gill material. Rub each Portobello mushroom down with a bit of olive oil.

Lightly salt and pepper the lamb and cook in a small skillet until just browned. Remove to a bowl. Next, cook the chorizo until just cooked, say 4-5 minutes. Add the lamb back in, as well as the onion, bell pepper, garlic, and mushroom stems and cook until softened, about 3 minutes. Remove from heat.

Transfer sausage-vegetable mixture to the bowl of a food processor. Add half of the breadcrumb/ cheese mixture, 1/2 the cilantro, the rub, and the remaining olive oil. Pulse until mixture is finely chopped and comes together slightly, about 30 seconds. Transfer the mixture back to your bowl, add the egg, and stir until well combined.

Divide the filling among the mushroom with 1/2 for each mushroom. Place the filled mushrooms on a baking sheet.. Divide the bread crumb/ cheese mixture evenly among the tops of the mushrooms. Bake until golden brown on top and the mushrooms are tender, about 15 to 18 minutes. Remove from oven and let cool slightly.

While the above is cooling, snap the asparagus to length and cook along with mushroom strips on a plate in microwave for 45 seconds. Remove to counter, divide into 2 portions. Fold each slice of Prosciutto in half lengthwise. Wrap each bundle of asparagus and mushrooom strips in one slice of Prosciutto, season with salt and pepper, and place in a lightly oiled skillet over medium heat. As you see the edges of the Prosciutto start to turn, flup the asparagus bundles carefully to cook the other side. This may only take like 2 minutes per side.

Remove the asparagus to your plates, then add the stuffed mushrooms tot he plates. Garnish them with remaining tablespoon of cilantro, drizzle with olive oil and vinegar and serve warm or at room temperature.

Friday, September 2, 2011

Slenderize Your Eggs

Everyone has their favorite recipe for boiled/deviled eggs, but this isn't about that. This is about technique, not taste. What I find really annoying is that when you fill them, they get top heavy, and unless you want to put them into a fancy holder, the tendency is to for them to fall over.

Well, no more. If you add a few hours of resting time into your preparation planning, you can have very unusual yet stable eggs for your guests. What's fun is to see if anyone even notices...

Ingredients:
one dozen eggs (at least a week old makes for better peeling)


Method:
Place the eggs into a pot and cover with cold water. Over high heat, bring to a boil. Cover, reduce heat and let lightly boil covered for 10 minutes. When time has elapsed, carry pot to sink and run cold water into pot to displace the hot water and cool the eggs.


Finally, I put the eggs into water and ice until cool. This not only cools them faster, but makes them easier to peel.


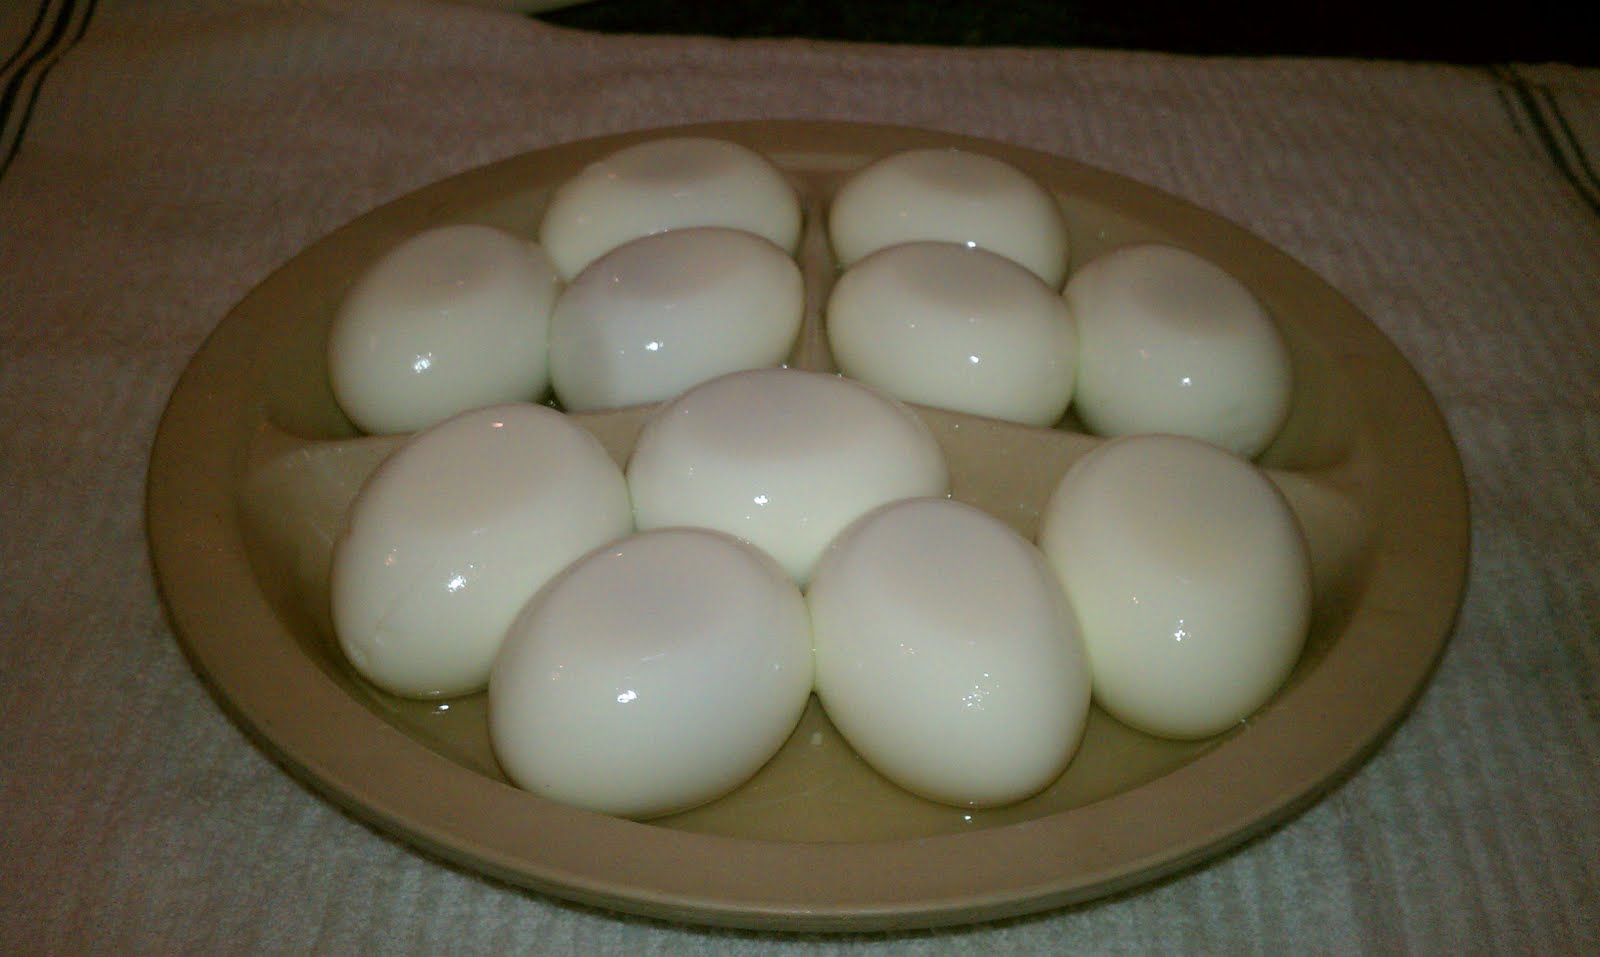
Peel the eggs carefully, removing all the shell but leaving the surface unblemished. Place the peeled eggs on a plate with a raised edge, so they don't skitter away. I leave them wet from the peeling process so that they can easily move around a bit.


Next, use a sturdy flat pan of some type or an inverted plate to cover the eggs. Weigh down the top plate with containers equaling 4-5 lbs. or so, placing them on top of the upper plate and checking to see that the weight is evenly distributed.


Over the space of a few hours, the matrix of the cooked egg whites will relax and allow the steady pressure to change the shape of the egg.


Give it 5 or 6 hours. Once you remove them from the fridge, they will be flat on both sides - just enough to keep them stable. Now when you prepare your eggs, deviled or otherwise, they will sit nicely and not roll or fall. Let everyone else figure out how you did it...


Thursday, August 11, 2011

Lower-calorie Soft Corn Tortillas

Usually when making dishes using corn tortillas, you are faced with some issues inherent in the tortillas themselves. When cold, they are kind of brittle and if bent very far will snap in half. If you heat them up, they become so soft that they fall apart, either immediately or when moving them around. The two methods most often suggested to help with this are to slip them in hot oil for a few seconds and then drain, or to dip them in hot enchilada sauce or the like.

I have found an easy way that you can make them stronger for use in recipes like enchiladas, without getting them either tough or hard and crunchy. It also has the benefit of not adding any fat, oil or calories to the process. It's really two steps - heating and tempering. Start off by heat ing a cast iron comal, or medium to large frying pan on the stove over medium heat.

Heat up your corn tortillas in the microwave - fast and easy. I use a tortilla warmer, but you can wrap them in a damp kitchen towel which will work fine. Once you take them out, they will be hot, but you'll see that they are also very soft and fragile.

One at a time, take out a hot tortilla and heat it on the comal, maybe 20 seconds, then carefully turn it over. You may need to repeat this. You will feel when you have heated that 'steamy' moisture out of the tortilla - it will be flexible but not weak. If you heat it too long this way, it will become like leather - toss it and try again. After a little practice you will get just the right consistency, and they won't be oily or soggy either. Give it a try!

Shredded Beef

Easy, inexpensive, juicy and full of flavor!

There are many cuts of beef used for making shredded meat, from top round to chuck roast. Hardly anyone uses brisket, because of its reputation for being so tough. Well, like so many other things, it’s more how you cook it. Brisket is not only full of beefy flavor, it is usually about the cheapest large cut of meat available. Let’s work some magic on it.

First you have to prepare the brisket for cooking. You can’t just take it out of the package and throw it in a pot. Remove the unwanted fat and other stuff, as described here. Then you’ll want to season the meat on all sides fairly well with fresh ground black pepper. We aren’t using any salt at this point for a couple of reasons. We are going to be reducing the cooking liquid, which would tend to make it saltier and saltier. Also, salt will draw moisture out of meat, that’s even an ancient technique for preserving it, so we don’t want to dry it out. Finally, we can always add it later, but you can’t take it out if you overdo it.

Next, you want to identify the grain direction in the meat. In the picture above, you can see that it runs from the upper left to lower right. You will then want to cut the meat in strips directly across the grain, each strip being a little wider than you want the final shredded meat to be. It is a lot easier to cut to length now than after it is cooked when it is so loose. Below you see pictures of both a brisket flat (top) and point (bottom) which have been peppered and sliced against the grain.

Now you can get out your 10” or larger Dutch oven, and add 16 oz. (one can) of beef broth, using reduced or no sodium if available and the same amount of water. Turn the heat to medium or medium-low. After that, into the pot goes the meat. It is okay if it’s not completely submerged, you’ll be moving it around later.

Cover the pot and let it cook at a low boil / simmer, rearranging the meat and adding liquid as needed about once an hour. After 3 to four hours, you will find that the meat has become quite tender, similar to a good pot roast. After 5 or 6 hours, you’ll find that the meat is falling-apart tender. Time to carefully fish it out.

Using two forks take out the pieces of meat one at a time and shred them. Continue this until the meat is all shredded. You will end up with a large pile of goodness like this:

As you shred each chunk of meat, put the finished shreds back into the cooking liquid to keep it moist, because once shredded it can dry out fairly quickly. One of the advantages of de-fatting the meat prior to cooking is that you don't end up with all that grease in the broth that remains. You will eventually end up with a nice big pot of shredded goodness. Use it from here, or you can prep to refrigerate or freeze it in portions, liquid included. Whatever you do, just be sure to keep it very moist, or you’ll end up with shredded jerky.

Brisket Prep 101

This is a tough topic to discuss. For some it will be far more than they want to know, and for some it will be old hat and nothing new. That doesn't make it any less valuable or worth going over one more time. Today’s topic is brisket – popular in many ethnic schools of cooking worldwide, and the pride of Texas BBQ masters. Brisket is known as the most difficult meat for BBQ smoking this side of a whole hog, and frustrates many a home and competition cook. Picking a brisket involves a lot of variables, including weight, shape and grades. All these things may have an affect on your final result, regardless of how you choose to cook it. Brisket is usually available three way: as a whole or "packer" brisket, found sealed in a heavy cryovac bag; as a brisket flat, or less often as just the deckle or point. I always buy packer briskets, as they are usually significantly less expensive per pound and I can prep them how I like. They also have a longer refrigeration/freezer life and less of a chance of contaminants as they are handled fewer times. The packaged flat and points are generally made up at the market, which means they are packaged and handled locally and not as sanitary as the factory anaerobically-bagged ones. Here is a 10 lb. typical ‘packer’ brisket:

On top of all that, I’ve seen briskets from as small as 7 lbs. to as large as 16 lbs. This raw weight can’t be directly used as a measure of how many portions you will end up with, because there is significant loss when cooking a packer brisket. Between all of the excess fat and some shrinkage in cooking, you can only expect to end up with between 50%-60% of the raw weight when you are done.

Brisket, like other cuts of beef, is also available in three grades: Select, Choice and Prime. This is determined primarily by the amount of marbling, or intramuscular fat, which is present in the beef, but also to some extent by the age of the animal. This type of fat equals flavor, tenderness and juiciness, so Prime beef is the most-marbled – and most expensive grade of beef. In most cuts, it is also the most difficult to find as a great deal of it goes straight to restaurants, and only 2% of beef is graded Prime. Choice is the next highest grade, and is perfectly acceptable for cooking. Select is third-highest grade, and usually the lowest grade found in stores. Meat that is not shown as graded is usually Select, but may be even lower. In my experience, It is worth buying Choice over Select, but except for a few great steaks, the price premium you’ll pay for Prime over Choice is rarely worth it. Try and buy Choice briskets if you can. Notice the imprint (below) on the cryo bag – the ink color is different depending on the grade of the meat. If present, this will either say USDA Select (black ink), USDA Choice (blue ink), or USDA Prime (red ink). If you can’t find the grading stamp on a cryovac bag, go elsewhere. Remember, this system is for beef. There is no comparable grading system for pork, you just have to use your eyes and your experience.

So, let’s get it out of the bag and look at what we have. The first thing you'll notice is that the brisket cut is roughly a long triangle. The brisket is actually parts of two different muscles, held together by connective tissue, and it comes from the breast area of the cow - one on either side between the front legs. Think chest muscle. The wider but thinner part is referred to as the 'flat', and the thicker, more pointed end is known as the point or deckle end. It is important to understand the difference between these two muscles, as you will see shortly. There is also a considerable amount of fat on the surface and within the brisket. One side of the meat (the top) seems to be entirely covered by fat, and the other side (the bottom) usually has some spots and one giant hard knot of fat. If you examine this fat more closely, you’ll see that there are three different ‘types’ of fat on the brisket. The two large muscles are held together by connective tissue and considerable fat. If you have ever had a large slice of brisket, chances are you’ve noticed a strip of fat running down the middle lengthwise – this is that layer.

The first type is a white very hard fat. The second type is like regular deposits or layers of a softer fat, and the third is a thin, membranous fat. You can see examples of these pointed out in the pictures below. The red circles outline some of the hard fat, and the blue circles some of the regular type fat. Once you identify the different types on your meat, you’ll be able to recognize it anywhere it occurs on the brisket.

Top (point side up)

Bottom (point side down)

Trimming a brisket for cooking really depends on the demands regarding how it will be prepared. When it comes to me, however, I always trim it very closely, discarding almost all external fat. This is a source of some amusement to some of my BBQ friends, as it flies in the face of the conventional wisdom. The mantra of cooking brisket low & slow is to cook untrimmed and fat side up, so that the melting fat cap “bastes” the meat below. Apologies to all, but that's hooey.

In my experience, the only way in which the exterior fat enhances the moisture in a brisket is that it hinders moisture from escaping, like a waterproof ‘blanket’. Unfortunately, if you are putting it on a smoker, the fat will also prevent the smoke making it’s way into the meat, and will keep any mop or rub you use from actually penetrating and seasoning the meat. As a result, I trim my briskets rather drastically, regardless of how I’ll be preparing it. As long as you pay attention to your cooking methods, you shouldn’t have an issue with drying your brisket out.

First I check to see if there is any patch of old brown surface (shoe leather) on the brisket. This is an artifact from the processing / aging process and is definitely not good eats. This usually occurs along the side, and you’ll want to remove this from your brisket wherever you find it.


Next, I remove all of the hard fat and large globs of regular fat from both surfaces of the brisket. These two pictures below correspond to the two smaller pictures above – same meat in the same position, just with the fat removed. In the pictures below, there are some patches circled in blue. Here you see some thin, light fat areas – this type of stuff is fine to leave behind.

Top (point side up)

Bottom (point side down)

Top (point side up) after trimming off the fat:

Bottom (point side down) after trimming off the fat:


Next, I remove all the hard fat I can from the area between the flat and point. Usually, I actually separate the two pieces completely for cooking, even if I am putting them on the smoker. The point end has much more marbling in it than the flat, and they tend to cook at different rates. Furthermore, the grain in the point runs at an angle of about 45° from the grain in the flat. This is important because brisket is something that you always slice across the grain to serve, just because of all the fibers. If the grain is running in two different directions, that is rather hard to do. Here you can see that I have hem separated, and all the large fat in between removed.

I know this is a lot of trouble, but if you pay attention you will have delicious meat without all the extra fat involved. If you are planning on removing the fat after you cook, I suppose you can, but it will be soft and much more difficult, in addition to all the other negative aspects of cooking with it intact.