Mostly about food, this blog is just a place for me to throw things that are of interest to me. I appreciate you taking the time to stop by an look around. This represents just some of the stops on the various pathways that this amateur home cook finds himself.

You may find that these foods tend toward protein and away from carbohydrates - this is due to diabetic issues, so I try to only sparingly use carbs, and good ones at that. Of course, sometimes I forget....

Feel free to drop me a line with any suggestions or just to let me know what you think. Thanks!

If you c


Search This Blog

A Little Navigation...

Yá át ééh!

I want to thank you for the time that you spend here, and hope that you can find useful things here.

Hagoonee'


Showing posts with label breads. Show all posts

Wednesday, August 1, 2012

Buttermilk Biscuits

This recipe was blatantly copied from  evilshenanigans.com - it's just that good.


This is so simple there's no reason not to make it.  The original author made a point of listing a few tricks, so I repeat them here:

First – When rubbing in the fat you want a good portion, around 90%, to be the size of pecans.  It will look, and feel wrong at first.  Trust me on this, big fat equals big layers.
 
Second – When I say knead the dough I do not mean the traditional push and turn.  I want you to flatten the dough with your palm until the dough is an inch or so thick then fold the dough in half over itself.  You will repeat this ten times.  You will see the dry mess you start with and say, “No way!  This will never come together!”  Trust me.  It will.

Third – When cutting out biscuits NEVER TWIST THE CUTTER EVER!  Did I say ever?  Yes?  Good.  Even after you press down and you are sure the biscuit is cut don’t be tempted to twist.  Just shake the cutter back and forth gently.

Last – Egg wash.  It will turn what would be a tepid biscuit into a gloriously golden, irresistible biscuit.  You can skip it, it makes no difference in flavor, but in overall appeal you will not regret it.

I encourage you to visit her site for the recipe plus numerous pictures, but here it is in plain form so you can see how easy it is.

INGREDIENTS:


5 ounces bread flour
5 ounces all-purpose flour
1/4 teaspoon salt
1/2 ounce sugar
3/4 ounce baking powder
3 1/2 ounces lard or butter, or a mix of each
6 1/2 ounces cold buttermilk
1 egg, beaten well


METHOD:
Heat your oven to 425 F and line a baking sheet with parchment paper.

In a medium bowl weigh out your flours, salt, sugar, and baking powder.  Blend well then add the shortening.

Rub in the shortening with your fingers leaving the majority of the shortening in large pieces.

Add the buttermilk and gently fold into the flour mixture with a spatula, about five folds.  Turn out into a floured surface.  The dough will be very shaggy.
Press the dough into a fat disk, then knead it ten times by pressing the dough out 1″ thick, folding the dough in half , turning it 1/4 turn and repeating.  Do not over knead.

Dust the surface with additional flour, and dust the dough, then roll out to your desired thickness.   Cut out the biscuits with a cutter of your choicem making sure never to twist the cutter.  You can press the scraps together, kneading then three times using the method above, and cut out additional biscuits.  Discard any remaining scraps.

Transfer the biscuits to the prepared baking pan and space them 1″ apart.  Brush with the beaten egg, making sure not to let the egg drip down the side.  Bake for 15 to 20 minutes (18), or until the tops and bottoms are golden brown.

Sunday, April 22, 2012

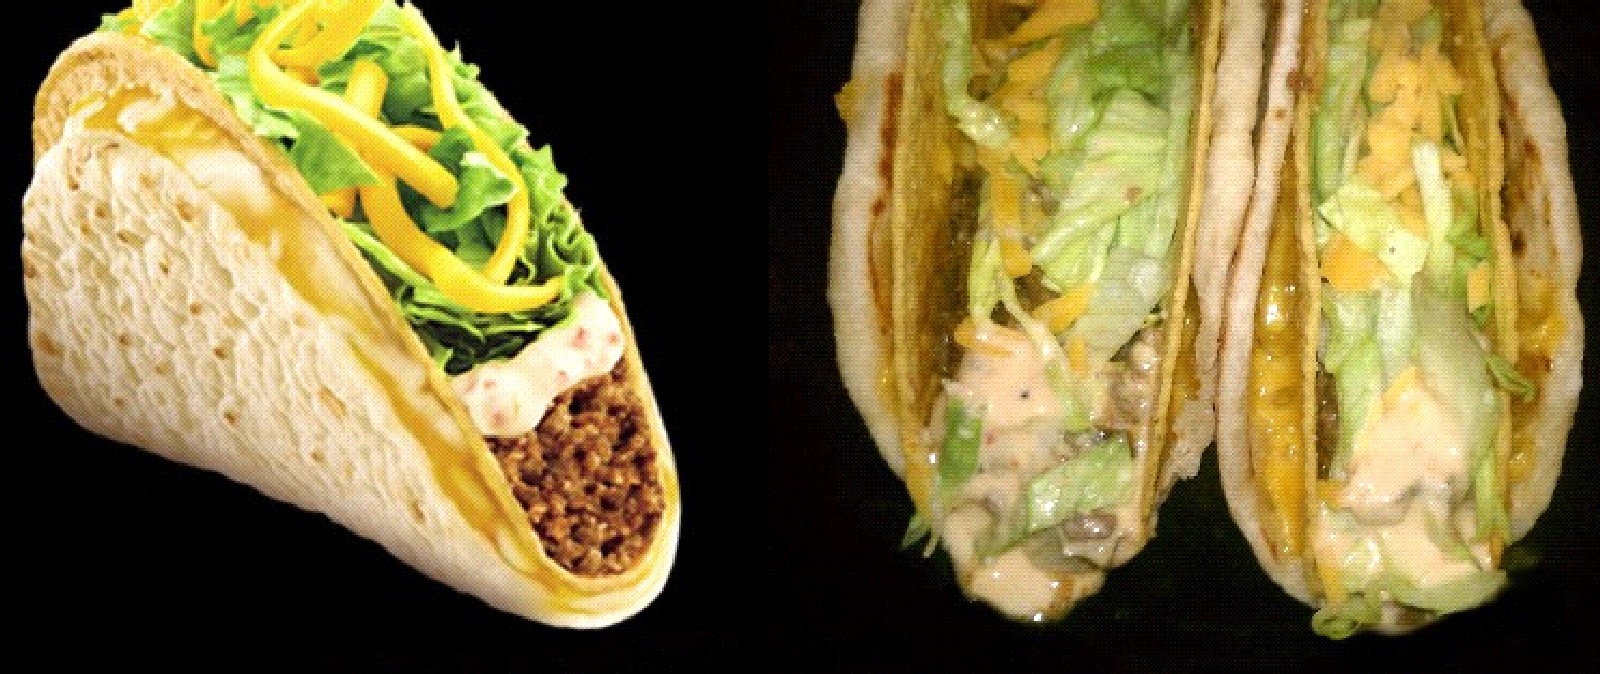
Taco Bell® Cheesy Gordita Crunch - Clone recipe


Warm, pillowy flatbread covered in a melted three-cheese blend, wrapped around a crunchy taco and topped with a zesty Pepper Jack sauce.”  So says the Taco Bell web site.   

Here’s my version - this is for Amanda!


My sauce is a little runny in the picture.  This comes from not refrigerating it before using it on the hot beef filling.  Don’t make the same mistake. Next time I make this I will replace with a better picture.  I am certainly no food stylist!  

Ingredients

  • 3 hard taco shells, pre-made is easier
  • 3 soft gordita tortillas (recipe here, or you can use thick flour tortillas or buy Gordita shells)
  • 1/4 cup EACH of shredded mozzarella, cheddar and Monterrey jack cheeses (or 3/4 cup of Mexican cheese blend)
  • 6oz Taco Bell clone beef recipe (recipe here)
  • Taco Bell Baja Pepper Jack Sauce clone (recipe here)
  • 1/2 cup finely shredded lettuce
  • ¼ cup of diced tomatoes (optional)
  • ¼ cup shredded cheddar cheese for topping

Method

1.      Gather your gorditas/tortillas.  Top each with about 1/4 cup (2 oz) shredded cheese in a thin even layer.  Warm these in the microwave until the cheese just melts, maybe 35-45 seconds depending on your microwave.

2.      Place a taco shell in the middle of the tortilla. Placing your fingers inside the hard shell, gently press the soft tortilla to the shell on each side until the melted cheese causes the sides of the heated tortillas to stick to the taco shells.  If you press too hard, you will break the hard shell, so be careful.  Let  these sit on there side for 20-30 seconds so the cheese can set. 

3.   Load as much taco meat into the shell as you like.  In the following order, layer in the chilled Baja Sauce clone, shredded lettuce, tomatoes (optional) and shredded cheddar cheese.

Taco Bell® Gordita shells - Clone recipe


Softer and more 'pillowy' than flour tortillas, these are really tasty and are good for many uses.

It has been brought to my attention that this recipe originally appeared in the blog for King Arthur Flour.  that is not where I found it, but it is their intellectual property and so they deserve the reference. The original resides at: http://www.kingarthurflour.com/blog/2009/07/16/fast-food-fix-gorditas-without-the-drive-through/.  Take time to go through the site - there are lots of tempting recipes there.


2 1/2 cups all purpose flour
1 1/4 cups boiling water
1/4 cup potato flour or instant potato flakes
1 1/4 teaspoons salt
2 tablespoons vegetable oil
1 tsp yeast

Place 2 cups of All-Purpose Flour in a bowl, and stir in 1 1/4 cups boiling water.  Stir till smooth. Cover the bowl and set the mixture aside for 30 minutes to cool.

Combine 1/4 cup potato flour (or flakes or buds) and the remaining 1 cup of flour with 1 1/4 teaspoons salt, 2 tablespoons vegetable oil, and 1 teaspoon instant yeast. Yes, that’s right; just 1 teaspoon. You don’t want/need these breads to rise very much.  Whisk till crumbly.  Add to the cooled flour/water mixture and stir together.  It’ll seem dry at first, but the dough will eventually pick up the flour/potato flour mixture, you can give it a hand with a bowl scraper.

Knead for several minutes (by hand, mixer, or bread machine). The dough will remain soft and somewhat sticky.  Finally, it’ll become very smooth.  Put the dough into a greased container.  Let the dough rise, covered, for 1 hour. It won’t rise a lot due to the small yeast quantity but it will rise some.

Next, divide the dough into 10 pieces. This is made very easy if you use a scale to do the math for you.  For example, my dough  weighed 700 grams, so each small ball was 70 grams.  Roll the pieces into balls and let rest, covered, for 15 to 30 minutes.

Roll each piece out into a circle about 5” across, which should be the same size as your taco shells are wide.   Get them very thin, 1/8” or less, because as you cook them they will rise a bit and get thicker.
Heat a cast iron skillet over medium heat; no oil necessary. Place one flatbread into the skillet.  Cook till spotty brown underneath, about 1-2 minutes, and the bread will puff up a bit.  Turn over, and cook till the other side is spotty as well, another minute or so.  If any bubbles arise, puncture them with a toothpick – we are making flatbread here, not pita bread.  Keep the warm in a stack under a kitchen towel as you finish the rest of the breads. 

It doesn’t matter if you have made more than you need - “extras” won’t stick around long!

Friday, April 20, 2012

If You Like Schlotzsky’s...


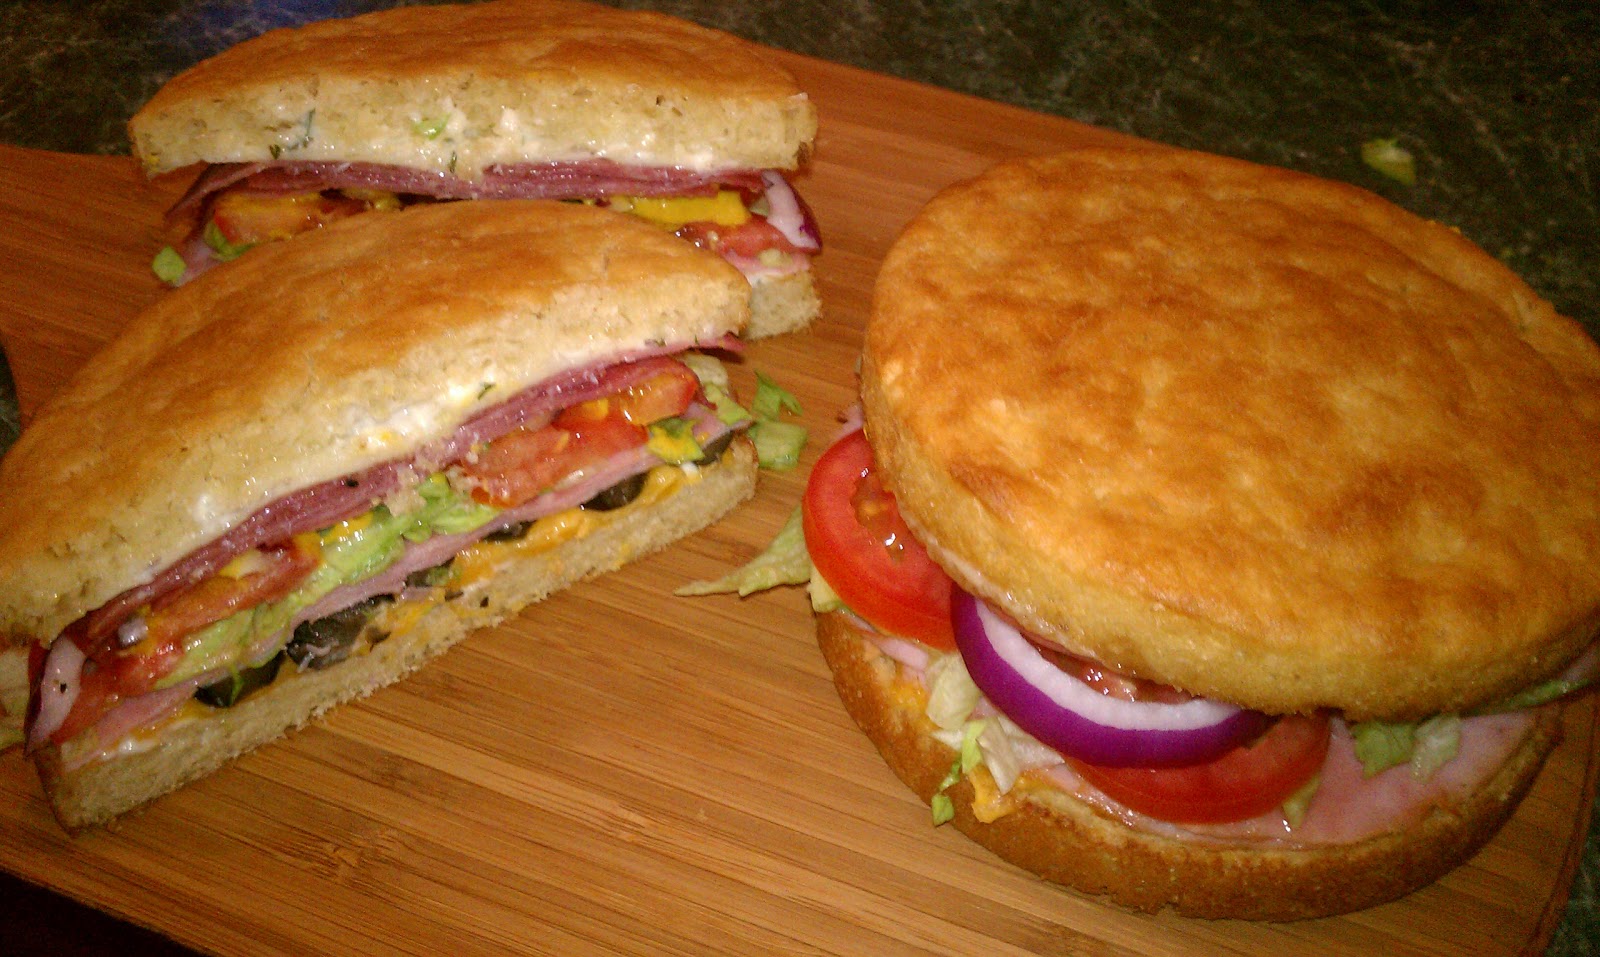
I had a Schlotzsky’s® Original sandwich a couple of weeks ago, and it had been years since the last one.  I forgot how great all those toasted layers played together, and especially how that great bun really anchored all the flavors with its special taste and texture.  Well, the OCD in me took over and I was determined to make it for myself.  There aren’t any of these restaurants near me, and I figured that if I wanted one I was going to have to make my own some how.

This was basically going to come down to three challenges: find a recipe to recreate the special bun, create a recipe to recreate the special garlic dressing, and getting the sandwich put together with the right things in the right order.

There are dozens and dozens of links to recipes for a “Schlotzsky bun recipe” on the internet, but they basically come down to two – the recipe the store uses (pounds of proprietary mix) or a home made copycat that everyone seems to have copied.  The first is obviously useless, the second I found unsatisfactory as it wasn’t really close.  After many tries, I think I have it nailed pretty well.

Starting with some stock recipes, it only took a few tries to get the garlic dressing down.  It’s very simple and very tasty, and can sure be used on other things too.  Finally, I found a reference from a former employee who laid out not only the ingredients for the sandwich, but also the order of assembly and the instructions for the technique.  He remains anonymous, but the process is outlined below.  Hopefully, some of you will undertake this project and provide me feedback on your results.  

Okay, here we go…

FILLING INGREDIENTS (for 1 large sandwich, adjust as needed):
CLONE - Sandwich Bun (recipe below)
CLONE - Creamy Garlic Dressing (recipe below)
Parmesan cheese, grated
1 cup mozzarella cheese, shredded
1 cup cheddar cheese, shredded
2 oz. cotto salami, sliced very thin
2 oz. genoa salami, sliced very thin
2 oz. boiled ham, sliced very thin
yellow mustard
red onion, sliced thin
tomatos, sliced
lettuce, shredded
½ cup black olives or marinated black olives


METHOD
Slice open the loaf horizontally into 2 even thicknesses.   

 
Apply spiral rings of garlic on each bun half starting from the outer edge inward - six for large, 3 for medium, 2 for small sandwich.  Add Parmesan cheese from a shaker, roughly 5 to 6 shakes to lightly dust both entire buns.

Distribute one cup of shredded cheddar cheese on the bottom bun, and one cup of mozzarella cheese on the top bun.  Put both buns in a toaster over at a heat of 375 degrees, to barely melt the cheese until you see it bubbling a bit, then pull them out and spread the cheese evenly with a spatula.
On the bun with the cheddar put 1/2 cup of the olives, then slices of boiled ham covering the entire sandwich overlapping each ham slice.

Remove the top bun from the toaster over spread the mozzarella cheese out evenly with the spatula; put the bottom bun back in the oven while you work on the top.

On the top bun place slices of cotto salami laid out the same as the ham then the slices of Genoa salami even spread out on top of the cotto salami, finishing with rings of yellow French’s mustard.  Put the top salami bun in the oven and take out the bottom bun and get ready to dress it.  On the bottom bun add first shredded lettuce, sparingly just enough to cover the bottom meat.  Next, add your slices of tomato and thinly sliced red or yellow onions, six thin slices, no more. 

Here are two beauties, ready to go.


Retrieve the other bun but it together, and prepare to feast!


CLONE - Original Sandwich Bun

Makes 2 large or 3 medium sandwich buns

INGREDIENTS
1 recipe CLONEsky’s® sourdough starter (recipe follows)
2 teaspoons white sugar
1/4 teaspoon baking soda
3/4 cup lukewarm milk (at about110° F)
1/2 teaspoon salt
2 cups bread flour
2 tablespoons corn meal


METHOD
In a large bowl, stir together the warm milk, sugar, salt and baking soda. Stir to dissolve, then add in the CLONEsky’s® sourdough starter and whisk together.  Beat the flour into the liquid mixture one half cup at a time until smooth, then move on to the next half-cup. When you are finished, the batter should be thick, very sticky and smooth.

Prepare 2 each 8” or 3 each 6” pie or cake pans with non-stick spray, and then scatter the bottom of the pans with the corn meal.  Divide the dough evenly between the prepared pans.  It won’t look right, but the batter will spread as the dough rises. Spray the top of each bun with non-stick cooking spray, and then cover and let rise for one hour in a warm draft-free spot for one hour.  I turn on the oven for a minute and then right back off, and let it rise in there.  It should be barely just warm.

Once the dough has finished rising, spray the top of the bread with non-stick cooking spray lightly again. Bake in a preheated 375° F for 20 minutes.  Once the top is lightly golden and a toothpick comes out clean, you are done.  Turn the finished loaves out on a cooling rack, and allow to cool for an hour before slicing.


CLONESKY’S SOURDOUGH STARTER - yields about 1 ¼ - 1 ½ cups
  • 1 cup warm water (110 degrees F)
  • 1/2 tablespoons active dry yeast
  • 1/2 teaspoon sugar
  • 1 cup all-purpose flour
Combine the water, yeast, and sugar. Let sit until the yeast becomes foamy, about 5 minutes. (If the yeast does not foam, discard the mixture and begin again with  new yeast – check the date.)
Add the flour and stir briskly to work in. Cover loosely and let rest in a warm, draft-free place (like an oven with pilot light or light) for 8 to12 hours. (The mixture should become very bubbly.)  Now you can use your Schlotzsky’s® sourdough starter to make your Markzsky’s® Original® No-Knead Sandwich Buns!
CAUTION: Never keep any sourdough starter tightly closed! The gasses that build up from the yeast can pressurize the container (such as a glass jar) and possibly make it burst!


CLONE - Creamy Garlic Dressing

1 c. mayonnaise                                               2 tbsp. minced parsley
1 tbsp. white vinegar                                       1 tbsp. milk
1/2 tsp. powdered garlic                                 1/2 tsp. sugar
1/2 tsp. salt

Whisk all ingredients together in a medium bowl.  Load into squeeze bottle and keep in refrigerator. Makes about a cup

Saturday, April 14, 2012

Jalapeño Cheese Flatbread


Ingredients

    • 3 12 cups flour
    • 1 teaspoon sugar
    • 1 teaspoon salt
    • 1 12 tablespoons yeast
    • 1 cup water
    • 4 tablespoons olive oil
    • 2 eggs
    • 4 tablespoons olive oil
    • 12 cup of chopped jalapeno peppers
    • 2 tablespoons Herbes de Provence
    • 1 12 cups of grated cheddar cheese

Directions

  1. In a large bowl mix together 1 cup of flour and the sugar, salt and yeast.
  2. Heat 4 T of oil and water until warm, then beat in egg.
  3. Add the liquids to the flour mixture and mix until moistened, and then beat for 3 more minutes.
  4. Stir in 1¾ cups of flour a little at a time until dough pulls away from the sides of the bowl.
  5. Place dough on a floured surface and knead in remaining flour.
  6. Place in bowl and cover for 8 minutes, then remove dough and place on greased cookie sheet.
  7. Cover with greased plastic wrap and two tea towels; let rise for 35 minutes.
  8. After rising, remove the plastic wrap and poke holes in one-inch intervals with a butter knife.
  9. Pour 4 T of oil on top, and sprinkle herbes, cheese and jalapenos evenly across the top as well.
  10. Bake at 400 degrees for 25 minutes or until golden, remove to cooling rack.

Saturday, July 30, 2011

Wild Sage Bread


Ingredients
1 package dry yeast
1 cup cottage cheese
1 egg
1 tablespoon melted lard/bacon grease
1 tablespoon sugar
2 teaspoons crushed dried sage
1/2 teaspoon salt
1/4 teaspoon baking soda
2 1/2 cups flour

Method
Combine sugar, sage, salt, baking soda and flour. Dissolve yeast in 1/4 cup warm water. Beat egg and cottage cheese together until smooth. Add melted shortening and yeast. Add flour mixture slowly to egg mixture, beating well after each addition until a stiff dough is formed. Cover dough with cloth and put in warm place until double in bulk (about 1 hour).

Punch dough down, knead for one minute and place in well-greased pan. Cover and let rise for 40 minutes.

Bake in a 350-degree oven for 50 minutes. Brush top with melted shortening and sprinkle with crushed, roasted pine nuts or coarse salt.

Monday, May 9, 2011

Easy Buttery Dinner Rolls


Ingredients
3 cups all-purpose flour
2 (1/4 -oz.) packages active dry yeast
1 teaspoon salt
2 tablespoons sugar
1/4 cup nonfat dry milk
1 1/4 cup warm water (105-115 degrees)
1 large egg, slightly beaten
8 tablespoons butter, melted
2 tablespoons butter-flavored vegetable shortening

Method
Place 2 cups flour in a large mixing bowl. Add yeast, salt, sugar and dry milk.

Set aside. In a mixing bowl, combine water and egg and stir to blend. Make a well in the center of the dry ingredients. Pour water mixture into the well. Mix by hand, beating 150 strokes and frequently scraping bottom and sides of bowl. Add 1/2 the melted butter and beat to incorporate. Add remaining flour, about 1/3 cup at a time, beating to incorporate each addition. Cover bowl with plastic wrap. Set dough in a warm, draft-free place such as oven with pan of hottest tap water on rack below. Allow batter to rise until doubled in bulk, about 1 hour.

Coat cups, bottoms and sides of a 12-cup muffin pan (or two small round pans) with butter-flavored vegetable shortening. Punch down batter (batter will be extremely soft and sticky). Drop by hand or spoonful into prepared muffin pan cups to make 12 rolls (if in pan, each roll touching the next). Brush dough with 1/2 remaining melted butter.

Let rise, uncovered, in warm, draft-free place until almost doubled in bulk, about 30 minutes. In preheated 400-degree oven, bake rolls on middle rack 16-18 minutes. Brush tops of cooked rolls with remaining melted butter. Serve immediately.