Mostly about food, this blog is just a place for me to throw things that are of interest to me. I appreciate you taking the time to stop by an look around. This represents just some of the stops on the various pathways that this amateur home cook finds himself.

You may find that these foods tend toward protein and away from carbohydrates - this is due to diabetic issues, so I try to only sparingly use carbs, and good ones at that. Of course, sometimes I forget....

Feel free to drop me a line with any suggestions or just to let me know what you think. Thanks!

If you c


Search This Blog

A Little Navigation...

Yá át ééh!

I want to thank you for the time that you spend here, and hope that you can find useful things here.

Hagoonee'


Monday, February 6, 2012

Capirotada


Capirotada is the Mexican version of bread pudding, but it is very different than the mushy custard-like type you might know.  Most often seen during Lent and Christmas time, it's is really worth a try even if you don't like bread pudding.

Like many Mexican recipes, there are many versions of this but they all have some things in common.  You'll find them containing bread, raisins, cheese and peanuts, with a syrup made from water, brown sugar or Mexican piloncillo, and several savory "apple pie" type spices like cinnamon, nutmeg, coriander, cloves, peppercorns and even
star anise which is poured all over it before it's baked.  I know the sweet and savory combination sounds really strange, but you won't believe how well it works together.

This was way better than I expected it to be the first time, so take the time to try my version below and see for yourself.   


Ingredients:

1 24" french bread baguette, or 4 large, stale bolillo rolls
4 T butter
Pam, or other cooking spray
4 1/2 C water
1 1/2 C dark brown sugar or 3 small piloncillo, about 12 oz. total
4 sticks of cinnamon
5 cloves or 1/4 t ground cloves
4 or 5 peppercorns
4 star anise (or 1 teaspoon anise seeds)
2 C cheese - queso fresco, Monterrey jack, or the like, grated
1 C raisins
1/2 C peanuts, crushed, or 1/2 C pecans, chopped 


Method:
Preheat oven to 350° and generously coat inside of casserole dish with spray oil.

Cut bread into 1/2" thick slices and lay them out on a baking sheet, toast in oven until dry.  In the meantime, melt the butter in a saucepan.  When the bread is dry and toasted put it in a large bowl and drizzle the melted butter over it.  Toss to coat completely.


Combine the water and the next 5 ingredients in a medium saucepan and bring to a boil, stirring often.  Once boiling, reduce to a simmer and continue simmering until reduced by 1/2 to 2/3, creating a nice syrup.  Strain and remove the spice pieces when the syrup has reduced.


Layer half the bread in the bottom of the casserole.  


Follow this up with half of the raisins, peanuts and cheese.  Pour 1 cup of of the syrup evenly over the the cheese, and let it sit for 10 minutes.  


Next layer the remaining bread, raisins, peanuts and cheese on top of what is already there, followed by another cup of syrup.  Wait another 10 minutes for that all to soak in, and then pour the remaining syrup evenly over the dish.  Before popping this in the oven, let it wait another 20 minutes to ensure everything is incorporated.


Cover the dish with aluminum foil that you have previously sprayed with the Pam so that it will not stick to the cheese.  Bake this for half an hour, uncover, and bake another 15-20 minutes until cheese is golden brown.  Best warm, but can be served at room temperature as well.


Easy Chicken Enchiladas


Ingredients

3 boneless skinless chicken breasts, about 6 oz. each
15-16 oz. chicken stock
salt, pepper
3 small cans diced green chiles
vegetable oil, for tortillas
12 corn tortillas
Pam or other spray oil
1 can crushed tomatillos
1 can green enchilada sauce
8 oz. shredded cheese, your choice


Method

Phase 1:
Put the chicken stock and chicken breasts in a large skillet over medium heat.  Season with salt and pepper.


Cook until you see the bottom half of the chicken has turned white, then turn chicken over and season again.


Once the entire chicken has turned white, remove the breasts to a cutting board to cool slightly.  Cut each breast into two or three pieces, across the length, so that the resulting shredded pieces won't be longer than about 1 1/2".  You may notice that the chicken is not completely cooked inside, but this isn't important, as it will finish in the next step.


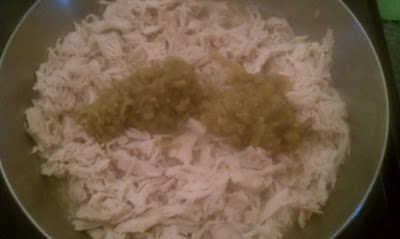
Using two forks, shred each cut piece of chicken, and return the shreds to the skillet, stirring occasionally as you you keep shredding.


Shredded chicken tends to dry out, but this process serves to keep the chicken very moist and finishes any cooking needed.


With all of the chicken back in the pan, open two cans of the diced green chiles and mix the contents into the shredded chicken.  If you want to make this dish ahead, you can stop here and finish the rest later or the following day.  If you do, just refrigerate the chicken mixture until you can continue.


Phase 2:
Put about 1/4" - 1/2" of cooking oil in a medium skillet over a medium heat.  Prepare a sheet pan with several layers of paper towels for draining the tortillas and set it close by.


Once the oil has come to frying temperature, slide a tortilla edge first into the oil.  You only need to leave it there for 2-3 seconds, as you are trying to soften it, not fry it.  Gently remove the tortilla to the paper towels, and repeat for the remaining tortillas, one a a time.


 Treating them this way makes them not only more flexible, but they are much less likely to break as you roll them up.  Once you have done all the tortillas, and pat the oil from the top of each, stack them up and set aside.

Prepare your casserole dish by spraying with the aerosol vegetable oil.  Not only does this make it much easier to get the enchiladas out of the dish when cooked, it really makes cleanup easy as well.  Gather your casserole, tortillas and filling together and get rolling.


I found that there is a simple easy way to get your enchiladas rolled tight and to keep all the filling from falling out.  Put your filling across the tortilla, then fold over the tortilla and pull tight (as in the picture below, but using both hands).


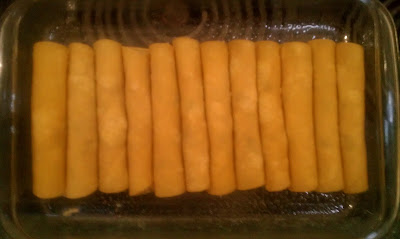
Keep it tight and continue rolling until you have just a little tongue showing underneath.

 
Transfer this to your casserole, placing it against one end as shown below so that it will not unroll.  Continue for the rest of the tortillas until your dish is filled.


Now combine the remaining can of green chiles , the crushed tomatillos and the enchilada sauce in a bowl or other container.  This recipe makes about a quart of sauce, but you will only need half of that, so freeze the rest for the next batch of enchiladas.


Slowly spoon/pour the sauce over the enchiladas, allowing a little run off at the sides. 


After this you can evenly distribute the shredded cheese over the top of the dish and you're done.  This is the second holding point - you can make these enchiladas to this point and cover with cling and refrigerate for hours or even until the next day before cooking if you need to.

Phase 3:
Preheat the oven to 350°, and bake until all the cheese has melted and starts to brown.  Everything is already cooked, so we are just heating everything together at this point.  Naturally, if you pull this from storage in the fridge, you will have to spend more time heating it up.  When a thermometer inserted in the center of the food reaches 200°, you are ready to go.


A servng can be 2 or 3 enchiladas, depending on how hungry you are.  You can also top them with anything from Pico de Gallo to sour cream and sliced black olives.

My Bad...

Okay, it's been three months since I've posted here - I'm a slacker.  Well, I have a few things on the spike that I will get uploaded as soon as I get them polished up.  Sorry I've been gone so long.

Enchiladas are coming up first, just for Julie and Vanessa!