Mostly about food, this blog is just a place for me to throw things that are of interest to me. I appreciate you taking the time to stop by an look around. This represents just some of the stops on the various pathways that this amateur home cook finds himself.

You may find that these foods tend toward protein and away from carbohydrates - this is due to diabetic issues, so I try to only sparingly use carbs, and good ones at that. Of course, sometimes I forget....

Feel free to drop me a line with any suggestions or just to let me know what you think. Thanks!

If you c


Search This Blog

A Little Navigation...

Yá át ééh!

I want to thank you for the time that you spend here, and hope that you can find useful things here.

Hagoonee'


Tuesday, September 11, 2012

SABOT Special

No, these don't have anything to do with wooden shoes or artillery. Instead, SABOT here stands for Shellfish, Avocado and Bacon On Telera roll.  Not hard to make, but an incredible melange of taste!


Ingredients:
Spicy Mayo (recipe below)
8 ounces lump crab, without shells
8 oz boiled & chilled shrimp, diced
2 scallions, white & green, minced
1 packed T fresh of fresh chopped cilantro
2 t  lime juice
3/4  seafood seasoning ( e.g. Old Bay)
1 t hot sauce (I prefer Crystal)
salt and freshly cracked pepper, to taste
bit of cumin
½ C mayonnaise

1 lg. avocado, refrigerated
4 slices cooked bacon, not soft, cut in half
2  lg Telera,Torta, or Poor Boy rolls

 
Spicy Mayo:
1 C mayonnaise
1½ T Sriracha Rooster Sauce
2 t coarse black pepper
1 T lime juice
1½ t kosher salt
½ t cayenne pepper

Method (makes 2):
Make the Spicy Mayo by combining all its' ingredients and mixing well.  cover and remove to the refrigerator for chilling, at least an hour.

Combine the shrimp and crab in a medium bowl, mixing well. 


Chop the scallions and cilantro as indicated and put in bowl.  Add the next six ingredients, and once you add the mayonnaise, mix well to incorporate.  This goes into the fridge to chill as well, and comes out when the Spicy Mayo does.

Once all has cooled down, taste and adjust salt and pepper as desired.  Next slice your rolls in half and lightly butter.  Actually, I use home-made ghee instead of butter because I like the results, but butter will do.  Once the bun has toasted, apply some nice squirts of the Spicy may across the face of each bun half. 


Apply a layer of the shellfish mixture on each half.  Prepare the avocado by halving it, removing the pit, and slicing each half into 4 thick slices.  On the bottom bun, toss on a nice thick layer of avocado topped with a layer of bacon.


 Assemble and chow down!


Monday, August 20, 2012

Carne Guisada - Cooks in the Jar!

Mexican beef stew for your pressure canner – in a 1 qt Mason jar.


This is not intended to be a primer for home canning.  You should already be familiar with that.  Additionally, do NOT attempt to make this recipe using a water bath canner.  Although it may cook and seal the jars, you have NOT prevented the possibility of disease that way.  You MUST use a pressure canner for this.


INGREDIENTS
1 t pepper
1 t dried granulated garlic                                          
½ t beef bouillon granules
¾ t flour                                                                      
½ t dried granulated onion
¼ t cumin                                                                    
¼ t chile powder

1 lb beef – chuck|round|sirloin, no fat and gristle      
1 fresh jalapeno, medium dice
1 medium onion, medium chop                                 
1 bell pepper, medium chop
1 T tomato paste


METHOD

1.      Measure the first 7 ingredients into a bowl; mix together well.

2.      Cut beef into approximately 1” cubes.  Remove meat to a large bowl.  Add in mixed spices, stirring to coat all of the meat.  You want to gather up all the spice you can and coat the meat. 

3.      Add your prepped vegetables to bowl, and mix the entire contents together well.


4.      Using your canning funnel, fill a quart Mason jar to just over half-full.  Using a rubber or plastic tool, remove the air pockets. 

5.      Next add in the tomato paste, and continue filling the jar, tightly packing in the remaining ingredients but leaving a 1” head space.

6.      Clean jar rim, covering with lid and band as per good canning practice.

7.      Process in a pressure canner for 90 minutes at 10 psi.

 
If  you have prepared it correctly and have a good seal, you now have a nice meal already 
cooked that can be stored for up to a year on a shelf, ready to go!


8.      When you finally do open the jar, you will notice that there will be quite a bit of liquid,  Although packed without any added water, the meat and especially the vegetables produce quite a bit as they cook.  If serving over a starch like rice, this is a plus.  For use in tacos, for example, you might want to simmer this down to a thicker consistency.


Carne Guisada can be eaten as-is, served over rice, or even in flour tortillas as tacos.  Season it with more black pepper and some hot sauce and it is a mighty good meal!

Thursday, August 9, 2012

Putting up Canned Bacon!

Well, it will come to no surprise to those that know me that I would have learned yet another way to work with bacon.  Here you will see how I have learned, mostly from BexarPrepper, how to can bacon so that it can be safely stored without refrigeration.


I need to say that you MUST do this using a pressure canner, not a water bath canner.  There is no safe way to can meat products with boiling water, it must be done under pressure.  This article assumes that the reader is familiar with the process before attempting to duplicate it.  This bacon was in the canner at 10 psi for 90 minutes. 

First, you need parchment paper, and it definitely has to be parchment paper, NOT waxed paper.  They are two different things for different purposes.  What I have seen it comes in a 15" width. 

I started out by unrolling some parchment paper.  In the shot below, I have laid out the bacon flush with the bottom edge, and you can see that I have left a space at the left hand edge about the width of a slice of bacon.More on this space later.


Next, I have covered the bottom half of the the bacon with a piece of parchment the same length but cut down to half the width of the bacon strips.


Next, fold the flap on the left over the first piece of bacon, and then take the entire covered bottom half of the bacon layer and fold it up and over the exposed bacon, like this:
 

  Now, starting from the end without the fold, start rolling the bacon up, tucking it in to keep everything even and snug.  When finished, you will end up with something that looks like this:


Insert your bacon roll into a wide-mouth quart Mason jar, bacon end first, and then push the rest of the parchment paper in before applying the lid and band.  Don't add any liquid to the jar, as the bacon will give off both bacon grease and water as it cooks in the canner.


When you do open, you will be presented with some soft-cooked bacon, which you can eat as is or cook longer to your desired degree of done-ness.  As a bonus, you will also have all of that wonderful bacon grease that was rendered from the canning process for cooking with as well.  Win-win!

Wednesday, August 1, 2012

Buttermilk Biscuits

This recipe was blatantly copied from  evilshenanigans.com - it's just that good.


This is so simple there's no reason not to make it.  The original author made a point of listing a few tricks, so I repeat them here:

First – When rubbing in the fat you want a good portion, around 90%, to be the size of pecans.  It will look, and feel wrong at first.  Trust me on this, big fat equals big layers.
 
Second – When I say knead the dough I do not mean the traditional push and turn.  I want you to flatten the dough with your palm until the dough is an inch or so thick then fold the dough in half over itself.  You will repeat this ten times.  You will see the dry mess you start with and say, “No way!  This will never come together!”  Trust me.  It will.

Third – When cutting out biscuits NEVER TWIST THE CUTTER EVER!  Did I say ever?  Yes?  Good.  Even after you press down and you are sure the biscuit is cut don’t be tempted to twist.  Just shake the cutter back and forth gently.

Last – Egg wash.  It will turn what would be a tepid biscuit into a gloriously golden, irresistible biscuit.  You can skip it, it makes no difference in flavor, but in overall appeal you will not regret it.

I encourage you to visit her site for the recipe plus numerous pictures, but here it is in plain form so you can see how easy it is.

INGREDIENTS:


5 ounces bread flour
5 ounces all-purpose flour
1/4 teaspoon salt
1/2 ounce sugar
3/4 ounce baking powder
3 1/2 ounces lard or butter, or a mix of each
6 1/2 ounces cold buttermilk
1 egg, beaten well


METHOD:
Heat your oven to 425 F and line a baking sheet with parchment paper.

In a medium bowl weigh out your flours, salt, sugar, and baking powder.  Blend well then add the shortening.

Rub in the shortening with your fingers leaving the majority of the shortening in large pieces.

Add the buttermilk and gently fold into the flour mixture with a spatula, about five folds.  Turn out into a floured surface.  The dough will be very shaggy.
Press the dough into a fat disk, then knead it ten times by pressing the dough out 1″ thick, folding the dough in half , turning it 1/4 turn and repeating.  Do not over knead.

Dust the surface with additional flour, and dust the dough, then roll out to your desired thickness.   Cut out the biscuits with a cutter of your choicem making sure never to twist the cutter.  You can press the scraps together, kneading then three times using the method above, and cut out additional biscuits.  Discard any remaining scraps.

Transfer the biscuits to the prepared baking pan and space them 1″ apart.  Brush with the beaten egg, making sure not to let the egg drip down the side.  Bake for 15 to 20 minutes (18), or until the tops and bottoms are golden brown.

Sunday, June 3, 2012

Caramelized Green Beans


Ingredients

  • 1 pound of fresh green beans, plus or minus
  • 2-3 tbsp of bacon grease
  • 1/4 cup cooked crumbled bacon
  • 2-3 cloves of minced garlic
  • 1 cup onion, chopped small
  • 1 cup low-sodium chicken broth
  • 1/2 cup of roasted red pepper, diced
  • 1 tsp salt and pepper to taste


Method

Remove the stem ends of the green beans by either snapping or cutting them off.  Remove the strings, if any.  Melt the bacon fat in a skillet over medium heat. Add the garlic and onions and cook until starting to wilt.  Add the bacon and saute until soft.  Add in the beans and toss together until beans are coated.


 Cook for a few minutes until the beans brighten up green.  Add in the rest of the ingredients  and mix well, then stirring occasionally as the stock reduces.  Increase heat to medium high and stir until beans start to caramelize.  Remove from heat and serve hot.


 Here are the finished beans as part of a nice all-veggie dinner, a rarity for me.


Saturday, May 26, 2012

Morning Air

Sometimes a little extra effort can make a nicely different treat.  I decided to whip up something light and yet tasty for the Lady of the House this morning and the result was a very light and tasty Morning Air.


Ingredients
6 eggs
1/4 tsp cream of tartar
6 strips of bacon. cooked and chopped
3/4 cup shredded cheese, cheddar or a favorite blend
4-6 mushrooms, sliced and sauteed in the bacon greased pan used above
2 scallions, white and green parts both sliced
salt and pepper to taste


Method
Carefully crack and separate the eggs, whites and yolks, into two large bowls.  It is critical that you don't get any of the yolk into the bowl of whites, so you might want to do the eggs one at a time into a smaller bowl, and then pour in the large bowls.

Place 2 8" non-stick skillets on the stove over medium heat.  I sprayed mine with some oil spray just to make sure they stayed non-stick.

Using a simple hand mixer, whip the egg whites until frothy, then add in the cream of tartar to really build some volume.  Once completed, start in on the bowl of egg yolks.  These will not rise nearly the same amount as the whites.  Now, with the mixer on low, add spoonfuls of the white mixture into the yolks and mix to incorporate.  Do not let the spoon touch the yolks.  Keep this up until you have about the same volume in both bowls.


Next, when the skillets are warm, place the whipped whites into one and the whipped yolk mixture into the other. If you can, level out the top of the whites.


Pre-heat the oven to 350°.  After 4-5 minutes, run a thin spatula around the edge of the whites, making sure that the mass has not stuck and is free to move.  Do the same for the yolks.  Place the skillets in the oven for 4-5 minutes until the mixtures have set - you will have to do the toothpick test like a cake.  In this case, if it comes out still a bit wet, that's okay.  Remove the skillets from the oven.  Although they will fall a little, they will retain a lot of air making this a light and fluffy egg dish.

Slide the egg white layer out of the skillet onto a plate.  Top with 1/4 cup of the cheese and about 2/3 of the the nice chopped bacon. 


Next, apply a layer of your sauteed mushrooms.  Add another 1/4 cup of shredded cheese to hold it all together


Microwave for 30-45 seconds until the cheese just starts to melt.  Remove from microwave, and invert the egg yolk pan over the plate.  Top with the remaining cheese and bacon.  Pop back in the microwave until the top cheese starts to melt. 


Top with sliced scallions, slice like a pie, and serve!


Thursday, May 17, 2012

Chilorio - not your local Tex Mex


This dish comes from the Mexican state of Sinaloa, on Mexico's west coast - the most famous town in it being Mazatlán. Thence comes Chilorio, part carnitas and part flavorful chile sauce. You can make the chile sauce as described below, or you can use my regular version. If you use this one, add some hot sauce to the mix as it is quite mild.

When distilled to simplest terms, it is long-braised pork infused in a chile sauce. As such in reality you can use whatever flavors you like in cooking the pork, and whatever mix of chiles you like in the chile sauce. Here is a pretty good start!

Ingredients
2.5 - 3  lb         pork butt (shoulder), cut into 2-3” chunks
1          cup      orange juice
1/2       cup      vinegar
1          cup      water , plus enough to cover eat
1          tsp       salt
4          ea         ancho chiles, dried
1          ea         chipotle pepper plus ½ tsp adobo sauce
6          ea         pasilla chiles, dried
6          ea         guajillo chiles, dried
6          clove    garlic
1/2       tsp       cumin
1          tsp       oregano, preferably Mexican
1/4       cup      parsley
1          tsp       black pepper
1          cup      chile soaking liquid
1/2       tsp       ground coriander
1/2       cup      fat; can be oil but lard or bacon fat preferred
1          ea         medium onion, julienned


Method

Cut the meat up and rinse well.  Place rinsed meat chunks in an large Dutch oven or heavy pot. Pour the orange juice and vinegar over the meat, and adding 1 cup of water plus enough to cover meat.  Add a teaspoon of salt and set over high heat. Once it comes to a boil bring the heat down to medium and let it simmer for about 40 to 45 minutes, or until most liquid has cooked off and the meat is thoroughly cooked and has rendered most of its fat.

Meanwhile, remove stems from chiles, make a slit down their sides and remove their seeds and veins. Place them in a bowl, barely cover them with 3 cups boiling hot water and let them sit and rehydrate for about 15 minutes. Place chiles and 1½ cup of their soaking liquid in the blender along with the garlic, parsley, oregano, cumin, black pepper, vinegar, and puree until your chile sauce is smooth.

Once the meat is ready, place it in a bowl along with any remaining cooking broth. Once it is cool enough to handle, shred it with your hands or using two forks. Drain shredded pork on paper towels.

In the same large cooking pot, heat your fat of choice over medium heat. Add the onion and cook until just translucent, then add the pork back in and heat throughout.


Next, pour in the chile sauce and coriander and let it season and simmer 4 to 5 minutes. Toss in the shredded meat along with any of its remaining cooking broth. Sprinkle in 1/4 teaspoon salt and let it cook, stirring often, until the meat has absorbed most of the chile sauce, which will have thickened, seasoned and changed color to a much darker tone.  It will take around 20 minutes. Salt and pepper to taste.

 
Serve with warmed flour tortillas on the side. You can also use the chilorio in tortillas and roll them into burritos. Below are tortillas and refried beans, along with your choice of guacamole, chilorio, sour cream and pico de gallo.  Doesn't get much better than this!


Wednesday, May 16, 2012

Pulled Pork Chiles Rellenos with Red Chile Sauce


Ingredients
4 large Poblano chiles
3⁄4 lb. smoked pulled pork
1 4 oz. can diced green chiles
1 1⁄4 cups cooking olive oil
1⁄2 red onion, diced
1⁄2 cup Monterrey jack cheese, grated
Salt and freshly ground black pepper
1 cup flour
3 eggs
1/2 cup home made red chile sauce, recipe here


Method
Place a rack about 4 inches from the broiler element and preheat. Lay chiles on a baking sheet in a single layer and broil, turning once, until they just begin to blacken and blister, about 5-7 minutes on each side. Put the chiles in either a closed paper bag or to a large bowl and cover tightly with plastic wrap. Let the chiles steam for 20 minutes or so. Peel off and discard the charred skin from of chiles, leaving the stem attached. Using a small knife, make a 2"long lengthwise slit near the top of each chile to form a pocket, and carefully remove the seeds without making the slit any longer. Set the chiles aside and allow them to cool.

Add the chopped onion and a little oil to a medium skillet over medium heat and sauté until softened, but do not caramelize.  Add in the chopped green chiles, and after mixing with the onions add in the pulled pork and enough liquid to make a moist filling.  Heat until well-combined, stirring occasionally. Transfer the filling to a large bowl. Let it cool slightly, and then add in the cheese, season with salt and pepper to taste, and stir to combine.


Stuff each chile with the mixture. Set chiles aside.  Put flour into a wide, shallow dish, and put the eggs into a large bowl and beat until well blended. Heat the remaining oil in a large nonstick skillet over medium-high heat.


Two at a time, dredge the chiles in flour, shaking off excess, then dredge in egg mixture, then back in flour and transfer to skillet. Fry chiles until golden brown on all sides, about 8 minutes total. Transfer chiles to a paper towel–lined plate to let drain.

 
Sprinkle with salt. Serve immediately, topped with red chile sauce and shredded cheese.

SERVES 4

Red Chile Sauce


Ingredients
6 dried  Ancho chiles
15 dried mild red New Mexico chiles
2 to 4 tomatillos, depending on size
1 teaspoon salt
1/2 teaspoon pepper
1/2 teaspoon garlic powder
1 teaspoon cumin
1 teaspoon oregano
1 tablespoon lard or bacon fat

Method
Remove stems and seeds from the dried chiles. Rinse in cold water. Place chiles in a saucepan and cover generously with water. Bring pan to boil, remove from heat, cover and let stand about 30 minutes or until the chiles are tender. Meanwhile, place the husked tomatillos in a small saucepan with just enough water to cover. Bring to boil, reduce heat, cover and simmer gently for 5 to 10 minutes or until very tender.
Place the chiles with the tomatillos in a blender, along with about a cup of the water the tomatillos were simmered in. Blend until pureed. Process the chili sauce through a china cap or food mill to remove any seeds and skin. Return to saucepan at a low simmer, and add the remainder of the ingredients.

You can use this as the basis for chile con carne, enchiladas, tamales, menudo, posole or chilaquiles. Double or triple the quantities, depending on how much you need. Add chicken broth or water to get the desired consistency if sauce is too thick.

Monday, April 30, 2012

Silky Chili Mac Italia

Fancy cooking?  Bah, sometimes you just want comfort food!


 Couldn't get motivated to be all culinary, so the alternative was to be creative.  Sometimes serendipity reigns, and it turns out pretty darned good.

COMPONENTS
1 quart home made chili, previously made, WITHOUT BEANS
2/3 cup shredded cheddar cheese
2/3 cup Jarlsberg cheese, diced small
12 ± Italian style meatballs, halved
4 oz.  elbow macaroni, cooked al dente

METHOD
Heat the chili gently in a large skillet.  When warm, add the meatballs.  


When hot (do not simmer or boil), start adding in the cheese a little at a time, stirring constantly to ensure complete melting.  This is what makes the final result silky, so don't get in a hurry.


 Once the cheese is fully incorporated, start stirring in the cooked macaroni.  When everything is finally heated together, serve in bowls along with Parmesan cheese, cracked black pepper and red pepper flakes available on the side.  If the chili you used is too spicy, some may also want some sour cream.


Sunday, April 22, 2012

Taco Bell® Cheesy Gordita Crunch - Clone recipe


Warm, pillowy flatbread covered in a melted three-cheese blend, wrapped around a crunchy taco and topped with a zesty Pepper Jack sauce.”  So says the Taco Bell web site.   

Here’s my version - this is for Amanda!


My sauce is a little runny in the picture.  This comes from not refrigerating it before using it on the hot beef filling.  Don’t make the same mistake. Next time I make this I will replace with a better picture.  I am certainly no food stylist!  

Ingredients

  • 3 hard taco shells, pre-made is easier
  • 3 soft gordita tortillas (recipe here, or you can use thick flour tortillas or buy Gordita shells)
  • 1/4 cup EACH of shredded mozzarella, cheddar and Monterrey jack cheeses (or 3/4 cup of Mexican cheese blend)
  • 6oz Taco Bell clone beef recipe (recipe here)
  • Taco Bell Baja Pepper Jack Sauce clone (recipe here)
  • 1/2 cup finely shredded lettuce
  • ¼ cup of diced tomatoes (optional)
  • ¼ cup shredded cheddar cheese for topping

Method

1.      Gather your gorditas/tortillas.  Top each with about 1/4 cup (2 oz) shredded cheese in a thin even layer.  Warm these in the microwave until the cheese just melts, maybe 35-45 seconds depending on your microwave.

2.      Place a taco shell in the middle of the tortilla. Placing your fingers inside the hard shell, gently press the soft tortilla to the shell on each side until the melted cheese causes the sides of the heated tortillas to stick to the taco shells.  If you press too hard, you will break the hard shell, so be careful.  Let  these sit on there side for 20-30 seconds so the cheese can set. 

3.   Load as much taco meat into the shell as you like.  In the following order, layer in the chilled Baja Sauce clone, shredded lettuce, tomatoes (optional) and shredded cheddar cheese.

Taco Bell® Baja Sauce - Clone recipe


Taco Bell®'s Baja Sauce, also known as Creamy Pepper Jack Sauce, is used in a number of their food products.  It's pretty tasty, so why not make it yourself.  I took ideas from some online recipes and adjusted the taste somewhat, but this one is for Amanda.  This recipe is from http://cookingventures.blogspot.com/.

INGREDIENTS
1/3 c pepper jack cheese, freshly grated, the finer the better
2 tbsp Parmesan cheese, freshly grated very finely
1/2 tsp cornstarch
1/4 tsp onion powder
1/4 tsp garlic powder
1/8 tsp  salt)
2 tsp corn syrup
1 tsp Dijon mustard
1 medium to large jalapeno pepper (seeds and ribs removed), very finely diced
1 Tbsp dry butermilk
1/2 c evaporated milk
5 TBSP vinegar, divided use
1 TBSP drained pimentos or roasted red peppers, diced
1/16 tsp (just a pinch) cayenne
¼- ½ cup mayonnaise (4-8 tablespoons) depending on desired consistency

METHOD
Combine the cheeses and cornstarch in a small bowl and mix well. Set aside.

In a small saucepan, whisk together the onion powder, garlic powder, salt, corn syrup, mustard, jalapeno, dry buttermilk, evaporated milk, and only 4 tablespoons of the vinegar. Whisk the mixture until the buttermilk powder has dissolved. Turn on the heat to medium and whisk often while the mixture is heating. Bring the mixture to a good simmer and, VERY IMPORTANTLY, remove the sauce pan completely from the heat. 

VERY slowly whisk in the mixed cheeses, about a tablespoon at a time. Briskly whisk for at least 1 minute after each addition, making sure the cheese have completely melted. If you add the cheese while still on the heat, you will cause the proteins in the cheeses to form gritty little particles that will ruin the texture of the sauce.

Add the cheese mixture to a blender with the pimentos/red peppers. Whiz the mixture until the jalapenos and pimentos are very finely chopped and the mixture is smooth. Scoop the mixture into a seal-able bowl and allow it to come to room temperature on your kitchen counter.

When the cheese mixture has cooled completely, add the remaining tablespoon of vinegar, the cayenne pepper and sufficient mayonnaise to bring it to the consistency you desire, then stir to combine. Seal and put the mixture in the refrigerator for at least 4 hours to allow the flavors to meld and the sauce to firm up.

Taco Bell® Gordita shells - Clone recipe


Softer and more 'pillowy' than flour tortillas, these are really tasty and are good for many uses.

It has been brought to my attention that this recipe originally appeared in the blog for King Arthur Flour.  that is not where I found it, but it is their intellectual property and so they deserve the reference. The original resides at: http://www.kingarthurflour.com/blog/2009/07/16/fast-food-fix-gorditas-without-the-drive-through/.  Take time to go through the site - there are lots of tempting recipes there.


2 1/2 cups all purpose flour
1 1/4 cups boiling water
1/4 cup potato flour or instant potato flakes
1 1/4 teaspoons salt
2 tablespoons vegetable oil
1 tsp yeast

Place 2 cups of All-Purpose Flour in a bowl, and stir in 1 1/4 cups boiling water.  Stir till smooth. Cover the bowl and set the mixture aside for 30 minutes to cool.

Combine 1/4 cup potato flour (or flakes or buds) and the remaining 1 cup of flour with 1 1/4 teaspoons salt, 2 tablespoons vegetable oil, and 1 teaspoon instant yeast. Yes, that’s right; just 1 teaspoon. You don’t want/need these breads to rise very much.  Whisk till crumbly.  Add to the cooled flour/water mixture and stir together.  It’ll seem dry at first, but the dough will eventually pick up the flour/potato flour mixture, you can give it a hand with a bowl scraper.

Knead for several minutes (by hand, mixer, or bread machine). The dough will remain soft and somewhat sticky.  Finally, it’ll become very smooth.  Put the dough into a greased container.  Let the dough rise, covered, for 1 hour. It won’t rise a lot due to the small yeast quantity but it will rise some.

Next, divide the dough into 10 pieces. This is made very easy if you use a scale to do the math for you.  For example, my dough  weighed 700 grams, so each small ball was 70 grams.  Roll the pieces into balls and let rest, covered, for 15 to 30 minutes.

Roll each piece out into a circle about 5” across, which should be the same size as your taco shells are wide.   Get them very thin, 1/8” or less, because as you cook them they will rise a bit and get thicker.
Heat a cast iron skillet over medium heat; no oil necessary. Place one flatbread into the skillet.  Cook till spotty brown underneath, about 1-2 minutes, and the bread will puff up a bit.  Turn over, and cook till the other side is spotty as well, another minute or so.  If any bubbles arise, puncture them with a toothpick – we are making flatbread here, not pita bread.  Keep the warm in a stack under a kitchen towel as you finish the rest of the breads. 

It doesn’t matter if you have made more than you need - “extras” won’t stick around long!

Friday, April 20, 2012

If You Like Schlotzsky’s...


I had a Schlotzsky’s® Original sandwich a couple of weeks ago, and it had been years since the last one.  I forgot how great all those toasted layers played together, and especially how that great bun really anchored all the flavors with its special taste and texture.  Well, the OCD in me took over and I was determined to make it for myself.  There aren’t any of these restaurants near me, and I figured that if I wanted one I was going to have to make my own some how.

This was basically going to come down to three challenges: find a recipe to recreate the special bun, create a recipe to recreate the special garlic dressing, and getting the sandwich put together with the right things in the right order.

There are dozens and dozens of links to recipes for a “Schlotzsky bun recipe” on the internet, but they basically come down to two – the recipe the store uses (pounds of proprietary mix) or a home made copycat that everyone seems to have copied.  The first is obviously useless, the second I found unsatisfactory as it wasn’t really close.  After many tries, I think I have it nailed pretty well.

Starting with some stock recipes, it only took a few tries to get the garlic dressing down.  It’s very simple and very tasty, and can sure be used on other things too.  Finally, I found a reference from a former employee who laid out not only the ingredients for the sandwich, but also the order of assembly and the instructions for the technique.  He remains anonymous, but the process is outlined below.  Hopefully, some of you will undertake this project and provide me feedback on your results.  

Okay, here we go…

FILLING INGREDIENTS (for 1 large sandwich, adjust as needed):
CLONE - Sandwich Bun (recipe below)
CLONE - Creamy Garlic Dressing (recipe below)
Parmesan cheese, grated
1 cup mozzarella cheese, shredded
1 cup cheddar cheese, shredded
2 oz. cotto salami, sliced very thin
2 oz. genoa salami, sliced very thin
2 oz. boiled ham, sliced very thin
yellow mustard
red onion, sliced thin
tomatos, sliced
lettuce, shredded
½ cup black olives or marinated black olives


METHOD
Slice open the loaf horizontally into 2 even thicknesses.   

 
Apply spiral rings of garlic on each bun half starting from the outer edge inward - six for large, 3 for medium, 2 for small sandwich.  Add Parmesan cheese from a shaker, roughly 5 to 6 shakes to lightly dust both entire buns.

Distribute one cup of shredded cheddar cheese on the bottom bun, and one cup of mozzarella cheese on the top bun.  Put both buns in a toaster over at a heat of 375 degrees, to barely melt the cheese until you see it bubbling a bit, then pull them out and spread the cheese evenly with a spatula.
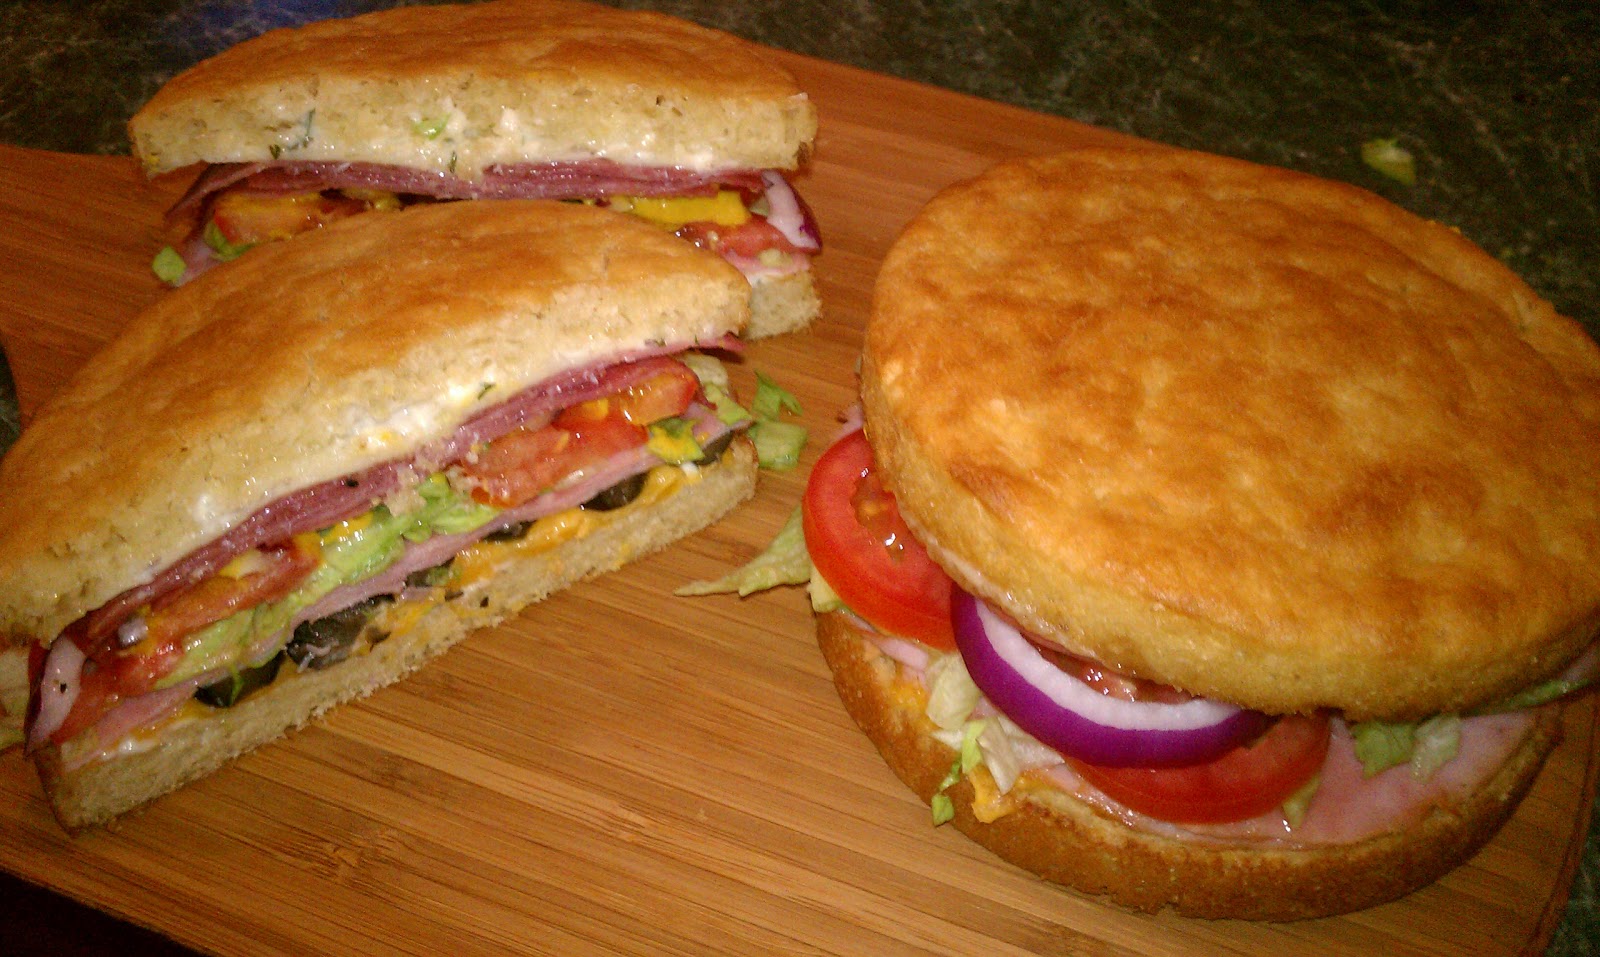
On the bun with the cheddar put 1/2 cup of the olives, then slices of boiled ham covering the entire sandwich overlapping each ham slice.

Remove the top bun from the toaster over spread the mozzarella cheese out evenly with the spatula; put the bottom bun back in the oven while you work on the top.

On the top bun place slices of cotto salami laid out the same as the ham then the slices of Genoa salami even spread out on top of the cotto salami, finishing with rings of yellow French’s mustard.  Put the top salami bun in the oven and take out the bottom bun and get ready to dress it.  On the bottom bun add first shredded lettuce, sparingly just enough to cover the bottom meat.  Next, add your slices of tomato and thinly sliced red or yellow onions, six thin slices, no more. 

Here are two beauties, ready to go.


Retrieve the other bun but it together, and prepare to feast!


CLONE - Original Sandwich Bun

Makes 2 large or 3 medium sandwich buns

INGREDIENTS
1 recipe CLONEsky’s® sourdough starter (recipe follows)
2 teaspoons white sugar
1/4 teaspoon baking soda
3/4 cup lukewarm milk (at about110° F)
1/2 teaspoon salt
2 cups bread flour
2 tablespoons corn meal


METHOD
In a large bowl, stir together the warm milk, sugar, salt and baking soda. Stir to dissolve, then add in the CLONEsky’s® sourdough starter and whisk together.  Beat the flour into the liquid mixture one half cup at a time until smooth, then move on to the next half-cup. When you are finished, the batter should be thick, very sticky and smooth.

Prepare 2 each 8” or 3 each 6” pie or cake pans with non-stick spray, and then scatter the bottom of the pans with the corn meal.  Divide the dough evenly between the prepared pans.  It won’t look right, but the batter will spread as the dough rises. Spray the top of each bun with non-stick cooking spray, and then cover and let rise for one hour in a warm draft-free spot for one hour.  I turn on the oven for a minute and then right back off, and let it rise in there.  It should be barely just warm.

Once the dough has finished rising, spray the top of the bread with non-stick cooking spray lightly again. Bake in a preheated 375° F for 20 minutes.  Once the top is lightly golden and a toothpick comes out clean, you are done.  Turn the finished loaves out on a cooling rack, and allow to cool for an hour before slicing.


CLONESKY’S SOURDOUGH STARTER - yields about 1 ¼ - 1 ½ cups
  • 1 cup warm water (110 degrees F)
  • 1/2 tablespoons active dry yeast
  • 1/2 teaspoon sugar
  • 1 cup all-purpose flour
Combine the water, yeast, and sugar. Let sit until the yeast becomes foamy, about 5 minutes. (If the yeast does not foam, discard the mixture and begin again with  new yeast – check the date.)
Add the flour and stir briskly to work in. Cover loosely and let rest in a warm, draft-free place (like an oven with pilot light or light) for 8 to12 hours. (The mixture should become very bubbly.)  Now you can use your Schlotzsky’s® sourdough starter to make your Markzsky’s® Original® No-Knead Sandwich Buns!
CAUTION: Never keep any sourdough starter tightly closed! The gasses that build up from the yeast can pressurize the container (such as a glass jar) and possibly make it burst!


CLONE - Creamy Garlic Dressing

1 c. mayonnaise                                               2 tbsp. minced parsley
1 tbsp. white vinegar                                       1 tbsp. milk
1/2 tsp. powdered garlic                                 1/2 tsp. sugar
1/2 tsp. salt

Whisk all ingredients together in a medium bowl.  Load into squeeze bottle and keep in refrigerator. Makes about a cup

Monday, April 16, 2012

Best Ground Beef Taco Mix - so far...

This is what Taco Bell beef would taste like if it was really good!


I have been in search of a really good taco meat creation process for a while now, and it has been somewhat frustrating.  As those who know me will attest, I'd rather cook from scratch than use a lot of store bought items, so a packaged mix was out.  Most of the recipes I've seen either result in dried out meat, runny meat, or some wacko balance of flavors, so I had to come up with something of my own.  At least I know what's in it (and can pronounce all the ingredients!).  This is not your standard spice mix, but it adds up to one flavorful and moist change from the standard blah mix.  I also like those new store-bought taco shells that are flat on the bottom.  Not only will they stand up for filling, you can get more goodies in them!  Now go and bite some tacos!


INGREDIENTS
1 lb ground beef - 80/20 or leaner
2 Tablespoon all purpose flour
2 teaspoon chili powder
1/2 teaspoon onion powder
1/2 teaspoon garlic powder
1 teaspoon paprika
1 1/2 teaspoons dried onions
1/4 teaspoon cumin
1 t beef bullion powder
1/4 teaspoon sugar
1 1/2 teaspoons corn starch
1 dash cayenne – for flavor, not heat (optional)

1/2 cup water


METHOD
Mix the raw ground beef with all ingredients except water.   I have found the easy way to do this is in a quart size plastic zip bag – add the meat and spices, and squish it around until it is uniformly distributed.  Keeps the hands clean.


In a skillet over medium to medium-high heat, brown the beef mixture along with 1/4 cup water.  The key here is to break up all of the ground beef as it cooks so that there are no chunks.  You want it reduced to a fine and even texture.  You can see below that there is still some liquid to dispel.


As the mixture cooks, add the remaining water occasionally until all incorporated.  Keep stirring and cook the meat until the proper consistency is reached - soft, juicy and velvety.  You may have to evaporate some of the water, but don't drain it or you'll lose flavor.


Ideally, the texture should be very moist but not quite like a Sloppy Joe mix.  This way it won’t be dry, won’t be over cooked and will stay in your tacos.  All you need do is add some lettuce, tomatoes and cheese, and voila - TASTY!